Fan Curves Connect Computer Temperature With Cooling Speed
Modern computers rarely run every cooling fan at one fixed speed. Instead, the motherboard monitors temperature readings and adjusts fan speed according to a predefined response pattern known as a fan curve.
A fan curve determines how quickly a connected fan should rotate as the monitored temperature rises or falls. At lower temperatures, the fan may operate slowly to reduce noise. As heat increases, the motherboard raises the fan speed to move more air through the case or cooling assembly.
These settings can influence system noise, processor temperature, graphics card temperature, storage temperature, and long-term stability. A poorly configured curve may allow excessive heat to develop before the fans respond, while an unnecessarily aggressive curve can make a computer loud even during light activity.
A Fan Curve Uses Temperature Points and Speed Targets
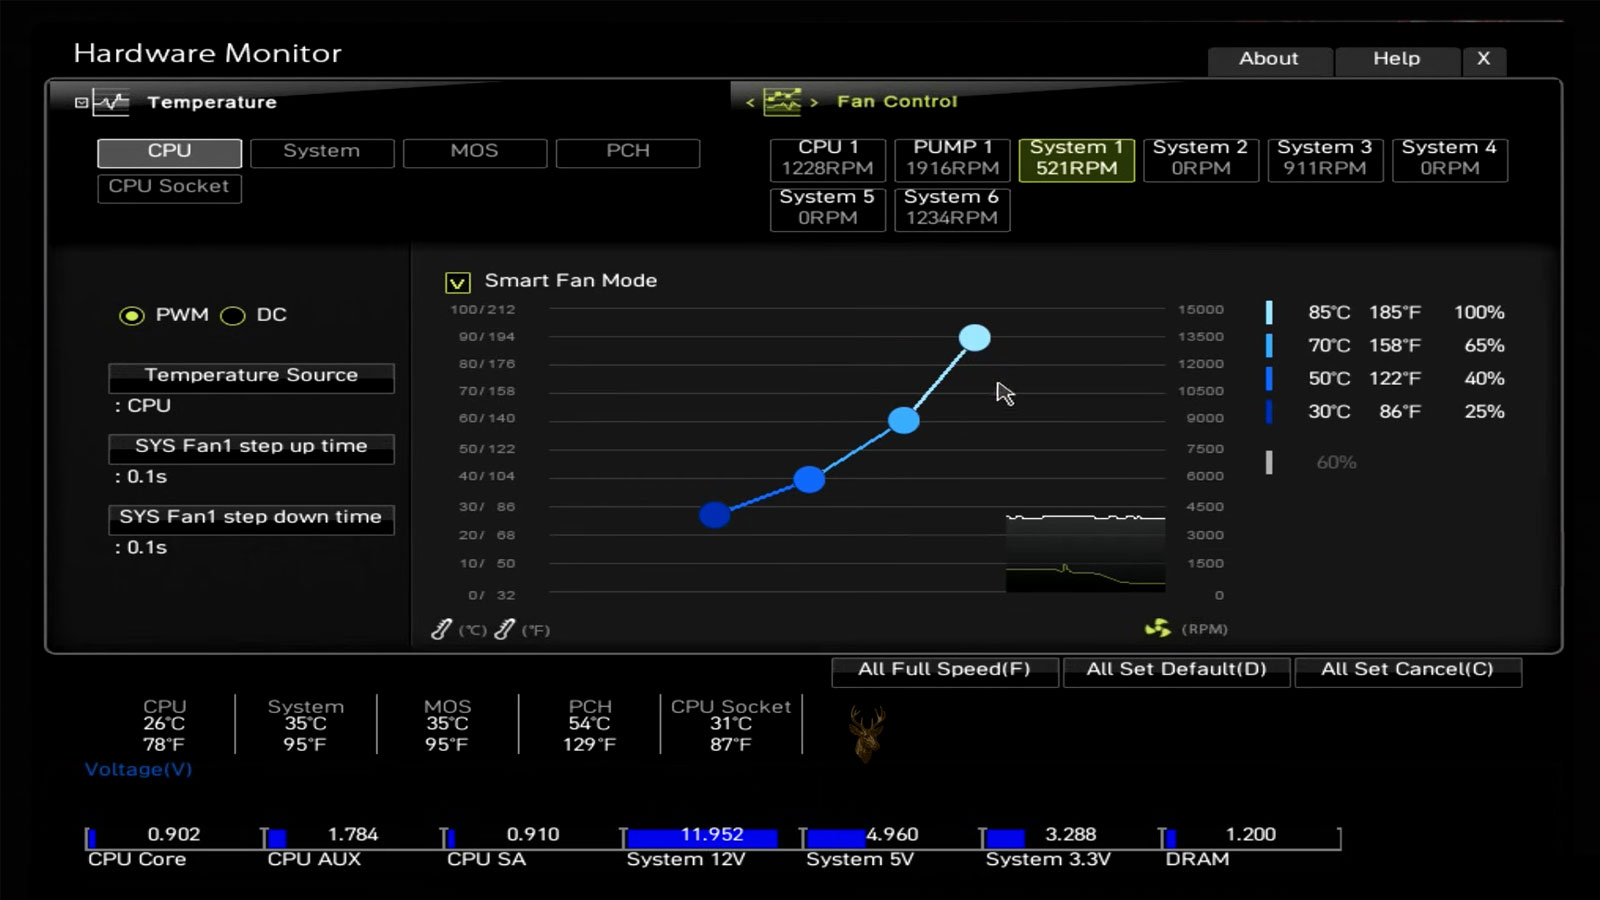
A typical fan curve contains several control points. Each point pairs a temperature with a fan-speed percentage or rotational target. The motherboard calculates the required speed between those points as the temperature changes.
For example, a system fan might run at 30 percent speed while the monitored component remains below 40 degrees Celsius. It may increase to 50 percent at 55 degrees, 75 percent at 70 degrees, and full speed near a higher temperature limit.
| Monitored temperature | Example fan response | General purpose |
|---|---|---|
| Below 40°C | Low speed | Quiet operation during light use |
| 40°C to 55°C | Gradual increase | Control ordinary background heat |
| 55°C to 70°C | Moderate to high speed | Respond to sustained workloads |
| Above 70°C | High or maximum speed | Remove heat during demanding activity |
The temperatures and percentages in this example are not universal recommendations. Appropriate values depend on the processor, cooler, case airflow, fan type, workload, and temperature sensor being used.
The Temperature Source Matters as Much as the Curve
A motherboard may allow each fan header to respond to a particular temperature sensor. CPU cooling fans commonly follow processor temperature, while case fans may be linked to the motherboard, chipset, or another available sensor.
If a case fan responds only to motherboard temperature, it may react slowly when the processor suddenly becomes hot. The CPU temperature can rise rapidly during a demanding task while the motherboard sensor changes more gradually.
The opposite situation can also occur. A case fan linked directly to CPU temperature may repeatedly speed up and slow down during brief processor activity, even though the overall case temperature remains stable.
Selecting the temperature source should reflect the fan’s location and purpose. A fan attached to a processor radiator has a different cooling role from a front intake fan or rear exhaust fan.
CPU Fans and Case Fans Serve Different Cooling Roles
The CPU fan removes heat from the processor cooler. Its response usually needs to follow processor temperature closely because CPU heat can increase within seconds when a demanding program begins.
Case fans manage airflow through the entire computer. Intake fans bring cooler air toward internal components, while exhaust fans remove warmed air from the enclosure. Their behavior may affect the graphics card, voltage regulators, storage devices, memory, and motherboard components in addition to the processor.
- CPU fans usually require a faster response to sudden temperature changes.
- Radiator fans should reflect the thermal behavior of the liquid-cooling system.
- Front intake fans help supply cooler air to multiple components.
- Rear and upper exhaust fans remove accumulated warm air.
- Small high-speed fans may become noticeably louder than larger fans at the same percentage.
Using the same fan curve for every header may produce uneven cooling because each fan is responding to a different physical requirement.
PWM and DC Fans Are Controlled Differently
Motherboards commonly support two main fan-control methods: pulse-width modulation and direct-current voltage control. The correct mode normally depends on the connector and internal design of the fan.
A four-pin PWM fan receives a constant supply voltage while a separate control signal determines its speed. A three-pin DC fan is usually controlled by changing the voltage delivered through the fan header.
| Fan type | Typical connector | Control method |
|---|---|---|
| PWM fan | Four pins | Pulse-width modulation signal |
| DC fan | Three pins | Variable supply voltage |
When the BIOS control mode does not match the connected fan, speed adjustment may be limited or unreliable. A fan may remain near full speed, fail to slow down properly, or stop at settings where stable rotation was expected.
Minimum Fan Speed Is Limited by the Fan Hardware
Not every fan can operate reliably at extremely low speed. Each model has a minimum starting voltage or PWM duty level required to begin rotating and a separate minimum level at which it can continue running.
A curve set below that operating range may cause the fan to stop, pulse, click, or repeatedly attempt to start. The BIOS may then report a fan error even though the fan operates normally at a higher setting.
This behavior is especially important for processor cooling. A CPU fan should not remain stopped unless the cooler and motherboard are specifically designed to support a safe fan-stop feature.
Testing the lowest stable speed helps establish the practical starting point for the curve. The selected value should leave enough margin for normal differences caused by age, dust, temperature, and manufacturing variation.
Fan Stop Features Can Reduce Noise but Require Careful Use
Some motherboards allow selected fans to stop completely below a specified temperature. This feature can make a computer quieter during idle operation, particularly when large heatsinks and efficient case airflow keep temperatures low.
Fan stop is not suitable for every fan location. A stopped intake fan may reduce airflow across storage devices or motherboard components even when the processor remains cool. Heat can also accumulate gradually inside the case without causing an immediate increase at the selected sensor.
Before enabling fan stop, several conditions should be considered:
- The fan must restart reliably when the control threshold is reached.
- The monitored sensor should represent the area being cooled.
- Passive airflow must be sufficient during low-load operation.
- Storage devices and voltage-regulation components should not become unusually warm.
- The fan should not repeatedly start and stop because of minor temperature changes.
A low continuous speed may provide a better balance when complete fan shutdown creates unstable temperatures or repeated cycling.
Temperature Spikes Can Cause Fans to Surge Repeatedly
Modern processors can change temperature quickly as they enter and leave short periods of high activity. Opening an application, loading a webpage, scanning a file, or installing an update may produce a brief temperature spike even when the overall cooling system is operating normally.
If the fan curve responds immediately to every small change, the fan may accelerate and slow down repeatedly. This creates an uneven sound that is often more distracting than a steady fan speed.
Many BIOS interfaces include response-time, step-up, step-down, hysteresis, or smoothing settings. These controls delay or soften speed changes so that a brief temperature spike does not trigger an unnecessary burst of fan noise.
A faster increase can still be appropriate when temperatures rise sharply and remain elevated. The goal is not to prevent the fans from responding, but to distinguish sustained heat from momentary activity.
Fan Response Delays Can Prevent Constant Speed Changes
Fan curves control the target speed, but response settings determine how quickly the fan moves toward that target. Without any delay, a small temperature change can cause an immediate adjustment even when the heat lasts for only a few seconds.
Step-up time controls how long the motherboard waits before increasing fan speed. Step-down time controls how long it waits before reducing speed after the temperature falls. Hysteresis creates a small temperature range in which the fan remains at its current level rather than reacting to every minor fluctuation.
These settings can reduce repeated fan surging during ordinary tasks while still allowing the cooling system to respond when heat remains elevated.
| Setting | Primary effect | Possible benefit |
|---|---|---|
| Step-up delay | Slows the increase in fan speed | Ignores brief temperature spikes |
| Step-down delay | Keeps the fan faster for a short period | Removes remaining heat before slowing |
| Hysteresis | Requires a larger temperature change before adjustment | Prevents constant switching between nearby speeds |
| Smoothing | Gradually changes the fan output | Produces less abrupt noise |
Different motherboard manufacturers may use different names for these controls, but their purpose is generally similar.
An Aggressive Curve Is Not Always the Best Cooling Strategy
Setting every fan to high speed at relatively low temperatures may reduce component temperatures, but it can also create unnecessary noise and increase dust movement through the case. Maximum speed is useful when the computer is under heavy load, but it is not always required during ordinary operation.
Cooling performance does not always increase in direct proportion to fan speed. A fan running at 100 percent may be considerably louder than it is at 70 percent while producing only a smaller improvement in temperature.
A balanced curve usually allows quiet operation at low load, a gradual response during moderate use, and a stronger increase once temperatures remain elevated. The exact balance depends on the cooling hardware and the acceptable noise level.
A Curve That Is Too Quiet Can Allow Heat to Accumulate
A fan curve can also be set too conservatively. If the fans remain at low speed until temperatures are already high, heat may accumulate inside the case before airflow increases enough to remove it.
This is particularly important during long workloads. A system may appear cool during a short test but become progressively warmer during gaming, rendering, data processing, or other sustained activity.
Possible signs of an overly quiet curve include:
- Processor temperatures continue rising during extended workloads.
- The graphics card recirculates warm air inside the case.
- Storage devices become unusually warm despite low CPU temperature.
- Fans suddenly jump to maximum speed after remaining quiet for too long.
- Performance drops because a component begins thermal throttling.
- The case remains hot after the demanding task has ended.
These symptoms may also involve blocked airflow, dust, poor cooler installation, or insufficient fan capacity. The curve is only one part of the cooling system.
Case Airflow Determines What the Fans Can Accomplish
A fan curve cannot compensate fully for poor airflow. If intake openings are blocked, filters are clogged, cables obstruct the air path, or exhaust space is restricted, increasing fan speed may produce more noise without moving enough cool air through the computer.
The direction of each fan also matters. A balanced layout usually brings air in through designated intake locations and removes it through rear or upper exhaust areas. Fans working against one another can create turbulence and reduce effective airflow.
Before modifying fan curves extensively, the physical cooling path should be checked for:
- Dust buildup on filters, heatsinks, and fan blades
- Fans installed in the wrong direction
- Blocked front-panel or bottom intake openings
- Cables positioned directly in front of the fans
- Insufficient space around exterior vents
- Missing, damaged, or poorly seated case panels
A well-designed curve works best when the fans have a clear path for moving air.
Positive and Negative Pressure Affect Dust and Airflow
Case pressure describes the relationship between intake and exhaust airflow. Positive pressure occurs when intake fans move slightly more air into the case than the exhaust fans remove. Negative pressure occurs when exhaust airflow is greater.
Positive pressure can help reduce dust entering through unfiltered openings because excess air tends to leave through gaps. Negative pressure may draw additional air through small openings around panels, expansion slots, and cable passages.
Fan curves can change this relationship as temperatures rise. A system that has positive pressure at idle may become negative under load if the exhaust fans accelerate more aggressively than the intake fans.
Perfect pressure balance is not always necessary, but large differences can influence dust accumulation and cooling behavior. Intake and exhaust curves should therefore be considered together rather than adjusted independently without observing the result.
Graphics Card Heat May Not Be Reflected in the CPU Fan Curve
During gaming or graphics-intensive work, the graphics card may become the largest source of heat inside the case. A case-fan curve linked only to CPU temperature may not respond strongly if the processor remains relatively cool.
The result can be a warm case even though the CPU-controlled fans remain at low speed. Graphics card cooling fans may compensate by running faster, but they still depend on the case to supply cooler air and remove exhausted heat.
Some motherboards and control utilities allow case fans to respond to the graphics processor or to the highest reading from several sensors. When that option is unavailable, a moderately responsive case-fan curve may provide more consistent airflow during mixed workloads.
Liquid Cooling Systems Have Additional Temperature Considerations
In a liquid-cooling system, radiator fans remove heat from the coolant rather than directly from the processor. The processor temperature can change quickly, while the coolant temperature usually rises and falls more gradually.
If radiator fans follow CPU temperature, they may surge during short processing spikes even though the coolant has not warmed significantly. A coolant sensor can produce a smoother response when the cooler supports that measurement.
Pump speed and radiator fan speed also serve different purposes. The pump circulates coolant through the loop, while the radiator fans transfer heat from the coolant into the surrounding air.
| Cooling component | Primary function | Typical control consideration |
|---|---|---|
| Pump | Moves coolant through the loop | Often kept at a stable medium or high speed |
| Radiator fan | Moves air through the radiator | Can follow coolant or processor temperature |
| Case intake fan | Supplies cooler air | Should support the radiator and other components |
| Case exhaust fan | Removes warmed air | Should prevent heat from collecting inside the case |
The appropriate configuration depends on whether the radiator is mounted as an intake or exhaust and whether the cooling system provides a separate coolant-temperature reading.
Pump Headers Should Not Be Treated Like Ordinary Fan Headers
Many motherboards include a dedicated pump header designed to provide higher current or a constant output. Connecting a liquid-cooling pump to an ordinary fan curve without checking the manufacturer’s requirements can reduce coolant flow or create unstable operation.
Some pumps are intended to run at a fixed speed, while others support controlled operation. A very low pump setting can produce poor circulation, trapped air noise, or rapid temperature changes even when the radiator fans are working correctly.
The cooler documentation and motherboard header limits should be reviewed before changing pump behavior. Fan-control settings that are safe for an ordinary case fan may not be appropriate for a pump.
Fan Header Current Limits Must Be Respected
Every motherboard fan header has a maximum electrical current rating. Connecting several fans through a splitter can exceed that limit even when each individual fan appears compatible.
Startup current may be higher than the normal running current, particularly when multiple fans begin rotating at the same time. Exceeding the header limit can cause unstable fan operation, motherboard protection shutdowns, or permanent damage to the control circuit.
A powered fan hub uses a separate power connection for the fans while receiving the control signal from the motherboard. This can be safer when several fans need to follow one curve, provided the hub and connected fans are compatible.
Fan Splitters Usually Report Only One Speed Reading
When multiple fans share one header through a splitter, the motherboard usually receives the speed signal from only one fan. Allowing several tachometer signals to reach the same header could produce inaccurate readings.
The other fans may still receive the same control signal and operate at similar percentages, but their actual rotational speeds can differ because of model variation, age, resistance, or mechanical wear.
A normal speed reading from the monitored fan therefore does not prove that every fan connected to the splitter is rotating correctly. Visual inspection and airflow checks remain important.
BIOS Presets Provide a Starting Point Rather Than a Perfect Result
Many motherboards include preset profiles such as Silent, Standard, Performance, or Full Speed. These profiles provide convenient starting points, but they cannot account for every case design, cooler, fan model, and workload.
A Silent profile may be too conservative for a compact case with limited ventilation. A Performance profile may be unnecessarily loud in a large enclosure with oversized fans and an efficient cooler.
Preset behavior should be tested under the computer’s actual workload. The most suitable curve is the one that maintains acceptable temperatures without producing unnecessary or unstable fan noise.
Testing Should Be Performed Under Real Workloads
A fan curve should be evaluated while the computer performs the kinds of work it is expected to handle. A system that appears cool while sitting idle may behave very differently during gaming, video editing, software development, rendering, or prolonged office use.
Observing temperatures for only a few minutes may not reveal how heat gradually builds throughout the case. Components such as storage devices, memory modules, voltage regulators, and graphics cards often continue warming long after the processor reaches a stable temperature.
Testing over a longer period provides a more complete picture of how the fan curve manages sustained heat instead of only short bursts of activity.
Ambient Room Temperature Influences Cooling Performance
Computer cooling depends on the temperature of the surrounding air. A system that maintains comfortable operating temperatures during winter may run noticeably warmer during the summer, even though no hardware settings have changed.
Because the cooling system removes heat by transferring it into the surrounding air, higher room temperatures reduce the difference between component temperatures and the available cooling air. Fans may therefore need to operate at higher speeds to achieve similar results.
This is one reason a fan curve that performs well in one environment may require adjustment after the computer is moved to another location.
Dust Accumulation Changes Cooling Over Time
Fan curves are often created when a computer is clean and airflow is unrestricted. As dust gradually collects on filters, heatsinks, radiator fins, and fan blades, airflow efficiency decreases even though the BIOS settings remain identical.
The result may be higher temperatures, longer periods at maximum fan speed, or increased thermal throttling under heavy workloads. Simply making the fan curve more aggressive may not restore the original cooling performance if airflow has become physically restricted.
Routine cleaning helps the existing fan curve continue operating as intended rather than forcing the fans to compensate for accumulated dust.
Temperature Monitoring Helps Confirm the Curve Is Working
After configuring a fan curve, monitoring temperatures under different workloads helps determine whether the response is appropriate. The objective is not to reach the lowest possible temperature but to maintain stable operation without unnecessary fan noise.
Useful observations include whether temperatures stabilize, whether fan speed changes smoothly, and whether the cooling system responds before components approach their thermal limits.
When evaluating the cooling system, it is helpful to observe:
- Processor temperature during idle and sustained workloads
- Graphics processor temperature during demanding applications
- Storage temperatures after extended activity
- Fan speeds as temperatures rise and fall
- Whether temperatures stabilize or continue increasing
- Any signs of thermal throttling or unexpected performance reduction
- Whether fan noise changes gradually or fluctuates constantly
Reviewing these patterns is often more informative than focusing on a single temperature reading.
Thermal Throttling Indicates Cooling Is Reaching Its Limits
Modern processors and graphics cards include protection mechanisms that reduce operating speed when temperatures approach predefined limits. This behavior, known as thermal throttling, helps prevent excessive heat but may also reduce overall performance.
If throttling occurs while the fans are already operating near maximum speed, the cooling system may require more than a fan curve adjustment. Dust buildup, insufficient airflow, degraded thermal interface material, or an undersized cooler may also contribute to the problem.
On the other hand, if throttling begins while the fans are still operating at relatively low speed, the fan curve may simply be responding too slowly to increasing temperatures.
BIOS Updates Can Change Fan Behavior
Motherboard firmware updates sometimes improve temperature reporting, sensor interpretation, or fan-control algorithms. After a BIOS update, previously saved fan curves may behave differently or be restored to default values.
Some updates also introduce new fan-control options or additional temperature sources. For this reason, cooling performance should be verified after significant firmware changes rather than assuming the previous behavior remains unchanged.
Recording custom settings before performing a firmware update makes it easier to restore them if the BIOS resets to factory defaults.
Fan Noise Alone Does Not Measure Cooling Efficiency
A louder computer is not automatically a cooler computer. Different fan sizes, blade designs, bearings, rotational speeds, and case layouts can produce very different sound levels while moving similar amounts of air.
Large fans often move substantial airflow at relatively low speeds, while smaller fans may require much higher rotational speeds to achieve comparable cooling. Bearing wear, blade contamination, or vibration can also increase noise without improving airflow.
Evaluating both temperatures and airflow provides a better indication of cooling effectiveness than relying on sound alone.
Hardware Changes May Require a Different Fan Curve
Replacing major components can alter the thermal characteristics of the entire computer. Installing a more powerful processor, changing the graphics card, adding additional storage devices, replacing the CPU cooler, or moving components into a different case can all change airflow requirements.
A fan curve that worked well before the upgrade may no longer provide the same balance between cooling and noise. Rechecking temperatures after hardware changes helps confirm that the existing settings remain appropriate.
| Hardware change | Possible cooling effect |
|---|---|
| Higher-performance processor | Greater CPU heat output |
| Larger graphics card | Higher internal case temperature |
| Additional storage drives | More heat near drive bays |
| Different CPU cooler | Changed airflow characteristics |
| New computer case | Different intake and exhaust airflow paths |
Adjustments should be based on observed temperatures after the upgrade rather than assuming previous settings remain ideal.
Factory Fan Curves Are Designed for Broad Compatibility
Motherboard manufacturers generally create default fan curves that work across many hardware combinations. These defaults prioritize reliable operation for a wide range of processors, coolers, fans, and computer cases.
Because every system differs, the factory profile may not provide the quietest operation or the lowest temperatures for a specific configuration. Custom adjustments can improve the balance, but dramatic changes should be tested carefully rather than applied all at once.
The original settings also provide a useful reference point if later adjustments produce unexpected results.
Small Adjustments Produce More Predictable Results
Changing several fan-curve points simultaneously can make it difficult to determine which adjustment improved or worsened cooling performance. Incremental changes allow each modification to be evaluated under similar operating conditions.
Testing after each adjustment makes it easier to identify how the computer responds to a specific change in temperature threshold, fan speed, or response delay. This gradual approach reduces the likelihood of creating unnecessary noise or allowing temperatures to rise unexpectedly.
Balancing Cooling Performance and Everyday Noise
A properly configured BIOS fan curve helps a computer respond intelligently as temperatures change. Instead of operating every fan at one fixed speed, the motherboard continuously adjusts airflow to match the current workload and thermal conditions.
Effective cooling depends on more than the curve alone. Airflow design, clean components, suitable fan placement, compatible control methods, appropriate temperature sensors, and regular maintenance all contribute to stable temperatures and reliable performance.
When these factors work together, the cooling system can maintain consistent operating temperatures while avoiding unnecessary fan noise during everyday use and providing additional airflow when demanding workloads generate more heat.