When Text and Icons Look Too Small on a Mac
A Mac can produce a clear and detailed image while still making text, icons, menus, and application controls appear uncomfortably small. This often happens after connecting an external monitor, changing a display setting, replacing a monitor, or moving between screens with different resolutions.
The problem does not always indicate a defective display. macOS uses display scaling to determine how large interface elements appear while continuing to take advantage of the monitor’s available pixels. A setting that creates more workspace also makes objects appear smaller, while a setting that enlarges text reduces the amount of information that fits on the screen.
Understanding this relationship helps explain why a high-resolution monitor may show smaller text than an older display even when both screens are physically similar in size.
A higher pixel count can provide greater detail without automatically making text easier to read.
Physical Screen Size and Resolution Are Different
The physical size of a monitor is measured diagonally, while its resolution describes the number of pixels available to form the image. Two monitors can have the same physical dimensions but use very different resolutions.
When more pixels are placed into the same physical area, each pixel becomes smaller. If the operating system displays interface elements according to the monitor’s full native resolution without sufficient scaling, text and icons may also appear smaller.
A larger screen does not necessarily produce larger text. A high-resolution 27-inch display may show smaller interface elements than a lower-resolution monitor of the same size unless macOS applies an appropriate scaled setting.
Retina Displays Use High Pixel Density
Apple Retina displays use a high concentration of pixels to create smoother text, sharper images, and more detailed interface elements. Rather than using every physical pixel as an independent unit of workspace, macOS normally combines the additional resolution with scaling.
This allows text and icons to remain at a practical size while using the extra pixels to improve clarity. The user sees an interface that resembles a lower logical resolution, but the display uses its higher physical resolution to render the content more precisely.
Because this process is closely integrated with supported Apple displays, the default scaling usually appears balanced without requiring extensive adjustment.
Retina scaling uses additional pixels to improve sharpness rather than simply creating more desktop space.
The displayed size and the monitor’s physical pixel count are related, but they are not the same measurement.
External Monitors May Scale Differently
External monitors are available in many combinations of screen size, resolution, pixel density, and connection type. macOS evaluates the information reported by the display and presents scaling options that it considers compatible with that hardware.
A standard-resolution monitor may provide comfortable text at its native setting, while a high-resolution external display may require scaling to prevent interface elements from appearing too small. The available choices can differ from those shown on the Mac’s built-in screen.
This difference becomes especially noticeable when application windows are moved between the built-in display and an external monitor. Text may appear larger on one screen and smaller on the other because the displays use different pixel densities and scaling configurations.
More Space Makes Interface Elements Smaller
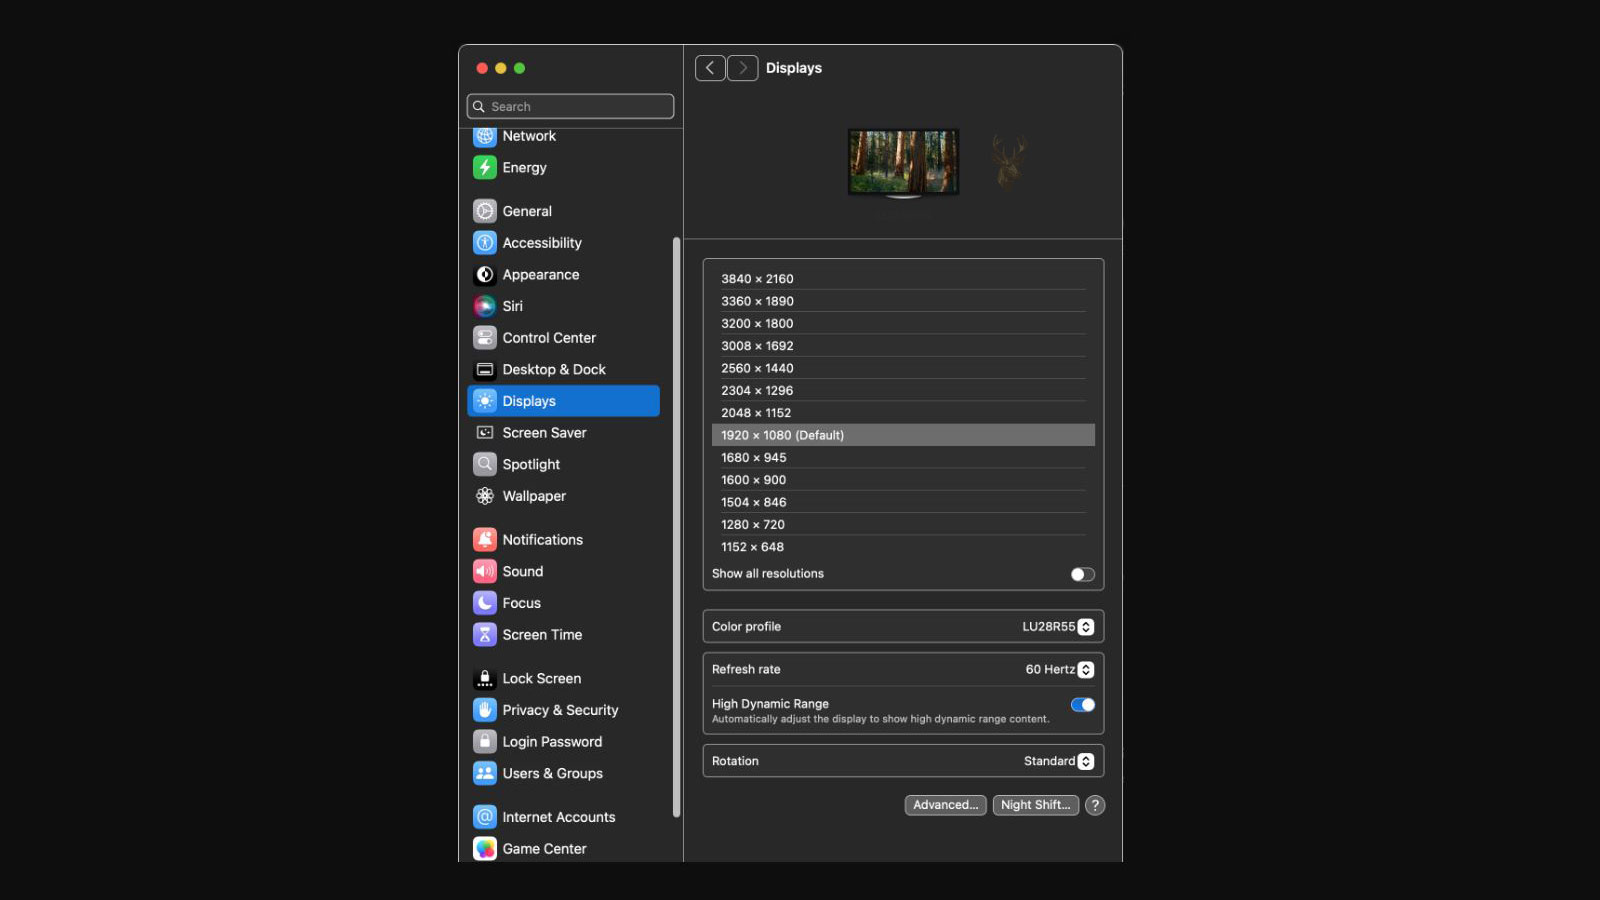
macOS commonly presents scaled display choices using descriptions such as Larger Text and More Space. Selecting More Space allows additional windows, controls, and document content to fit on the desktop, but each element appears smaller.
Selecting a setting closer to Larger Text increases the apparent size of menus, icons, and application content. The tradeoff is that less information fits within the visible desktop area.
Neither choice changes the physical dimensions of the screen. The setting changes how macOS maps interface content to the pixels provided by the display.
| Display Choice | Typical Result |
|---|---|
| Larger Text | Interface elements appear larger with less workspace |
| Default | Balances readability with available desktop space |
| More Space | More content fits on the screen, but text appears smaller |
| Native Resolution Without Suitable Scaling | Content may appear extremely small on a high-resolution monitor |
The most appropriate setting depends on viewing distance, eyesight, monitor size, application requirements, and the amount of workspace the user needs. A technically supported resolution is not always the most comfortable choice for daily use.
Display scaling becomes more complicated when a Mac is connected to an external monitor through an adapter, docking station, or cable that limits the available display modes. The monitor may be capable of a higher resolution, but macOS can offer only the settings supported by the complete connection.
This is why the same monitor may present different scaling choices when connected through another port, cable, or computer. The display itself has not changed, but the signal path may be reporting or supporting a different set of capabilities.
The Connection Can Limit Available Resolutions
External monitors may connect through HDMI, DisplayPort, USB-C, Thunderbolt, or an adapter that converts one signal type into another. Each connection has its own bandwidth and compatibility limits.
If the connection cannot carry the monitor’s full native resolution at the desired refresh rate, macOS may provide a reduced set of display choices. A lower connection limit can also affect whether certain scaled modes appear in Display settings.
Replacing an older adapter or cable with one that supports the required resolution may restore additional options, but only when the Mac and monitor also support them.
Display scaling depends on what the Mac, cable, adapter, and monitor can support together.
USB-C Ports Do Not All Provide the Same Display Support
USB-C describes the connector shape but does not guarantee a specific video capability. Some USB-C ports support DisplayPort Alt Mode or Thunderbolt, while others may be intended mainly for charging or data transfer.
A USB-C cable can also vary in capability. One cable may carry high-resolution video, charging, and data, while another may support charging at a lower data rate without the same display performance.
When a monitor connects successfully but offers only limited resolution or scaling choices, the port and cable specifications should be considered along with the monitor itself.
A USB-C connection that powers a Mac does not automatically guarantee full external display support.
The video standard carried through the port determines the available monitor capabilities.
Docking Stations May Restrict Display Modes
Docking stations allow several accessories and monitors to connect through one cable, but the dock may divide its available bandwidth among multiple devices. A monitor connected directly to the Mac may therefore provide more scaling choices than the same display connected through a dock.
Some docks support only certain combinations of resolution and refresh rate. Adding a second monitor can further reduce the modes available to each display, depending on the dock design and the Mac model.
When text appears too small and the preferred scaled setting is unavailable, testing the monitor with a direct connection can help determine whether the dock is involved.
Refresh Rate Can Affect the Available Scaling Choices
Higher refresh rates require more display bandwidth. A connection that supports a monitor’s full resolution at 60 Hz may not support the same resolution at a higher refresh rate.
macOS may respond by reducing the available resolution choices or by limiting which scaled modes can be selected. Lowering the refresh rate temporarily can sometimes reveal additional resolution options.
This tradeoff is especially relevant on high-resolution gaming or professional monitors that support both elevated refresh rates and dense pixel layouts.
| Connection Condition | Possible Result |
|---|---|
| Older Adapter | Higher resolutions or scaled modes may be unavailable |
| Limited USB-C Cable | The monitor may connect at reduced capability |
| Dock With Multiple Displays | Bandwidth may be divided between monitors |
| High Refresh Rate Selected | Some resolutions or scaling choices may disappear |
| Direct Monitor Connection | May provide more complete display options |
macOS May Hide Additional Resolutions
Depending on the macOS version and connected display, the Display settings panel may initially show only a simplified selection of scaled choices. Additional resolutions can sometimes be revealed through an option that displays all available modes.
These extra choices may include settings that create more workspace or enlarge interface elements beyond the default selections. However, not every available mode provides the same image quality or readability.
A setting that appears technically compatible may produce text that is softer, smaller, or less comfortable than the recommended scaling mode.
Scaled Resolutions Can Require Additional Processing
Some scaled display modes are rendered internally at one resolution and then resized to match the monitor’s physical pixel grid. This allows macOS to provide interface sizes that fall between the most basic choices.
The process can require additional graphics resources, particularly when driving a high-resolution external monitor. On most modern Macs, the effect may be difficult to notice during ordinary work, but demanding applications can place greater pressure on the graphics system.
The selected mode may also appear slightly less sharp than a scaling option that maps more naturally to the display’s pixel density.
A scaled mode can improve readability even when it does not use the monitor’s pixels in the simplest possible arrangement.
Application Zoom Is Different From Display Scaling
Display scaling changes the apparent size of the macOS interface across the entire screen. Application zoom changes only the content within a particular program.
A web browser can enlarge a webpage without changing the size of the menu bar, Dock, desktop icons, or other applications. A word processor can increase document zoom while leaving the rest of the operating system unchanged.
Application zoom is useful when only certain content is difficult to read. Display scaling is more appropriate when text and controls appear too small throughout the entire Mac interface.
| Adjustment | What It Changes |
|---|---|
| Display Scaling | The apparent size of the overall macOS interface |
| Browser Zoom | Webpage content within the browser |
| Document Zoom | The visible size of a document without changing its layout |
| Text Size Setting | Text within supported applications or interface areas |
Different Applications May Respond Differently
Most current Mac applications adapt well to display scaling, but older programs may not render every interface element correctly. Text may appear soft, controls may remain unusually small, or certain windows may not resize as expected.
An application can also use its own interface-size or zoom settings independently from macOS. This can make one program appear comfortable while another remains difficult to read on the same display.
When the issue affects only one application, reviewing that program’s viewing, zoom, or accessibility settings may be more effective than changing the resolution for the entire monitor.
Two Monitors Can Use Separate Scaling Settings
macOS can assign different display settings to each connected monitor. The built-in Retina display may use one scaled mode while an external monitor uses another based on its own resolution and pixel density.
This flexibility allows each screen to remain reasonably readable, but it can also create noticeable size changes when a window is moved from one monitor to another. An application may appear larger on one display and smaller on the other.
Matching the apparent size perfectly is not always possible when the monitors use very different pixel densities. The goal is usually to choose the most comfortable setting for each screen individually.
Mirroring Can Reduce the Available Choices
When displays are mirrored, both screens must show the same desktop image. macOS may select a resolution that both displays can support, even if one monitor is capable of a higher native resolution.
This shared mode can make text appear larger, smaller, or less sharp on one of the screens. Extending the desktop instead of mirroring allows each monitor to use its own resolution and scaling configuration.
Mirroring is useful for presentations and duplicated viewing, but it may not provide the best everyday scaling for monitors with different specifications.
Accessibility Settings Can Improve Readability
When changing display scaling alone does not provide a comfortable result, macOS includes accessibility options that can make portions of the interface easier to see. These may include screen zoom, pointer-size controls, contrast adjustments, and supported text-size settings.
These features can improve readability without reducing the overall desktop workspace as much as a larger scaling mode. They are especially useful when only certain interface elements are difficult to see.
The most effective adjustment depends on whether the problem affects all content or only specific text, controls, and applications.
- Use display scaling when the entire interface appears too small
- Use application zoom when only document or webpage content is small
- Use accessibility zoom for temporary magnification
- Adjust pointer size when the cursor is difficult to locate
- Review text-size options in applications that support them
Choosing the correct type of adjustment avoids changing the entire display when only one part of the viewing experience needs improvement.
When a Mac continues to show text, icons, or application controls at an uncomfortable size, the next step is to determine whether the behavior comes from an unsuitable setting, an incomplete display connection, a software limitation, or a hardware problem. The appearance of the issue often provides useful clues.
A display that is sharp but difficult to read usually points toward scaling or application-size settings. A display that is blurry, distorted, intermittently detected, or limited to unusual resolutions may require closer examination of the cable, adapter, dock, monitor, or graphics connection.
A Sharp Image With Small Text Usually Indicates Scaling
When the desktop image is clear, straight, and stable but every interface element appears too small, the monitor is probably operating at a high resolution without a comfortable scaled mode. This is common on high-resolution external monitors that provide a large amount of workspace.
Selecting a setting closer to Larger Text can improve readability without indicating that the monitor is defective. The change simply tells macOS to use the available pixels differently.
If only one application appears too small, the program’s own zoom or interface settings should be reviewed before changing the entire display configuration.
Clear but undersized content usually points to a scaling choice rather than a failed display panel.
Blurry Text Can Have a Different Cause
Text that appears soft or slightly blurred may result from a scaled mode that does not align cleanly with the monitor’s physical pixel layout. It can also occur when the monitor is operating below its native resolution.
Standard-resolution external monitors may render text differently from a built-in Retina display because their pixel density is lower. Moving the same window between the two screens can make the difference especially noticeable.
A damaged cable or unstable adapter usually causes more obvious symptoms such as flickering, brief black screens, color distortion, or lost detection rather than consistently soft text alone.
The Monitor Should Be Checked at Its Native Resolution
Every flat-panel monitor has a native resolution that matches its physical pixel grid. Operating at that resolution usually provides the clearest image because each part of the digital picture maps directly to the display panel.
On a high-resolution screen, macOS may still present a scaled interface while internally using the monitor’s native pixel structure. This is different from forcing the monitor to operate at a lower non-native resolution.
If the display is set to an unsupported or unusual resolution, text and graphics may appear stretched, soft, or incorrectly proportioned.
Native resolution describes the monitor’s physical pixel layout, while display scaling controls the apparent size of the interface.
These two settings are related, but they should not be treated as the same thing.
Incorrect Monitor Information Can Limit macOS Choices
A monitor communicates its supported resolutions, refresh rates, and other characteristics to the Mac. This identification information helps macOS determine which display modes should be available.
If a dock, adapter, switch, or cable interferes with that information, the monitor may be identified incorrectly or treated as a generic display. macOS may then offer fewer scaling choices or select a lower default resolution.
Disconnecting unnecessary adapters and connecting the monitor directly can help determine whether the identification problem comes from an intermediate device.
| Visible Behavior | Possible Explanation |
|---|---|
| Image is sharp but everything is small | Scaling is set for more workspace |
| Image is soft across the entire screen | The monitor may be using a non-native resolution |
| Preferred scaling choices are missing | The adapter, dock, cable, or monitor information may be limiting the available modes |
| Only one application appears small | The application may use separate zoom or interface settings |
| Display flickers or disconnects | The signal path may be unstable |
A New Cable May Change the Available Modes
Replacing a cable can affect more than basic monitor detection. A cable that does not support the required bandwidth may prevent macOS from offering the monitor’s full resolution or preferred refresh rate.
The monitor may still display an image, but it can operate in a reduced mode that makes scaling choices less suitable. A properly rated cable can restore higher display modes when the Mac and monitor already support them.
Cable length, construction quality, adapter design, and the display standard carried through the connection can all influence the result.
Restarting Can Restore Display Detection
Display settings can occasionally remain in an unexpected state after a monitor is disconnected, a dock is removed, or the Mac wakes from sleep. Restarting the Mac with the monitor connected may allow macOS to detect the display again and rebuild the available choices.
Turning the monitor off and reconnecting its cable can also help when the display is not reporting its capabilities correctly. The order in which a dock, monitor, and Mac are powered can sometimes influence detection.
A temporary detection problem should be distinguished from a scaling preference that returns consistently after every restart.
Sleep and Wake Can Change External Display Behavior
Some external monitors reconnect differently after the Mac wakes from sleep. The display may return at another resolution, briefly disappear, or cause application windows to move to a different screen.
A dock or adapter that does not resume the display connection correctly may cause macOS to treat the monitor as newly connected. The preferred scaling mode may then be unavailable until the connection is reset.
If the issue appears only after sleep, testing a direct connection and reviewing monitor power-saving settings can help isolate the cause.
A display that changes resolution only after sleep may have a reconnection problem rather than a permanent scaling limitation.
Display Arrangement Can Affect Everyday Readability
The position and distance of a monitor influence how comfortable its scaling feels. A high-resolution display placed farther away may require a larger interface setting than the same monitor positioned close to the user.
Monitor height and viewing angle can also affect perceived sharpness and comfort. Text may seem harder to read when the display is viewed from an angle or positioned outside the user’s natural line of sight.
Scaling should therefore be selected after the monitor is placed in its normal working position rather than judged from an unusually close distance during setup.
Small Text Is Not Always Solved by Lowering Resolution
Reducing the monitor resolution can make objects appear larger, but it may also reduce sharpness and available workspace. On many displays, choosing a proper scaled mode provides a better result than forcing a lower non-native resolution.
Application zoom and accessibility settings may also address readability without changing the clarity of the entire desktop. The best adjustment depends on whether the problem affects the whole interface or only specific content.
A lower resolution should therefore not be treated as the only solution when text appears too small.
Third-Party Display Utilities Should Be Used Carefully
Some users install third-party utilities to reveal additional resolutions or create custom display modes. These tools can provide more flexibility, but they may also introduce settings that are not ideal for the monitor or connection.
An unsupported mode can cause a blank screen, distorted image, reduced refresh rate, or unstable display behavior. Custom configurations may also complicate troubleshooting because they change how macOS normally manages the monitor.
Before using an additional utility, the direct connection, built-in scaling choices, cable capability, and monitor specifications should be reviewed first.
A Consistent Troubleshooting Process Helps Identify the Cause
Display problems are easier to isolate when one variable is changed at a time. Replacing several cables, changing multiple settings, and adding new software simultaneously can make the original cause difficult to identify.
- Confirm whether the problem affects the entire interface or only one application
- Review the current scaling and resolution choices
- Check whether the monitor is operating at its expected native resolution
- Test the monitor with a direct connection when possible
- Remove unnecessary adapters, switches, or docking stations
- Try a cable rated for the required resolution and refresh rate
- Restart the Mac with the external monitor connected
- Compare the display before and after waking from sleep
These checks help separate a normal scaling preference from a connection or hardware problem.
Some Symptoms Point Beyond Scaling
A monitor that shows lines, flashing colors, image distortion, repeated black screens, or complete signal loss may have a problem unrelated to interface size. The cable, adapter, display input, graphics output, or monitor hardware may require further testing.
If the same unusual image appears in the monitor’s built-in menu, the monitor itself may be involved. If another display works correctly through the same Mac port, the original monitor or its cable becomes more suspect.
When every external display shows the same problem, the Mac’s graphics connection, software configuration, or dock may require closer examination.
| Test | What the Result Can Indicate |
|---|---|
| Another cable restores full resolution | The original cable may have limited the connection |
| Direct connection restores scaling choices | The dock or adapter may be involved |
| Another monitor works normally | The original display or its connection may be involved |
| All monitors have the same issue | The Mac, software settings, or graphics path may be involved |
| The monitor menu also appears distorted | The display hardware may be involved |
Comfortable Scaling Depends on the Entire Setup
The most appropriate Mac display setting depends on more than the monitor’s advertised resolution. Screen size, pixel density, viewing distance, cable capability, refresh rate, application behavior, and personal readability needs all influence the final result.
A setting that provides excellent workspace for one user may make text too small for another. The goal is not necessarily to select the highest available resolution or the option that fits the most content. The better choice is the mode that keeps the image clear while making the interface practical for daily work.
When the expected choices are missing, the complete display connection should be checked before assuming that macOS or the monitor cannot support a more suitable configuration.
Mac display scaling controls the apparent size of text, icons, windows, and interface elements without directly changing the physical size of the monitor. High-resolution screens can provide sharper images and more workspace, but they may require a scaled mode to remain comfortable to read.
External monitors may offer different choices depending on their pixel density, connection type, cable, adapter, dock, refresh rate, and the information they report to macOS. Missing or unsuitable settings can therefore result from a limitation anywhere along the display path.
Reviewing the scaling setting, native resolution, connection quality, and application behavior provides a reliable way to distinguish normal display configuration from a software or hardware problem.