The Display Bezel Is More Than a Decorative Frame
When looking at a laptop, most attention goes to the display itself. The thin border surrounding the screen is often viewed as a purely cosmetic feature, especially as manufacturers continue reducing bezel size to create a larger viewing area. In reality, the display bezel performs several important mechanical and functional roles that extend far beyond appearance.
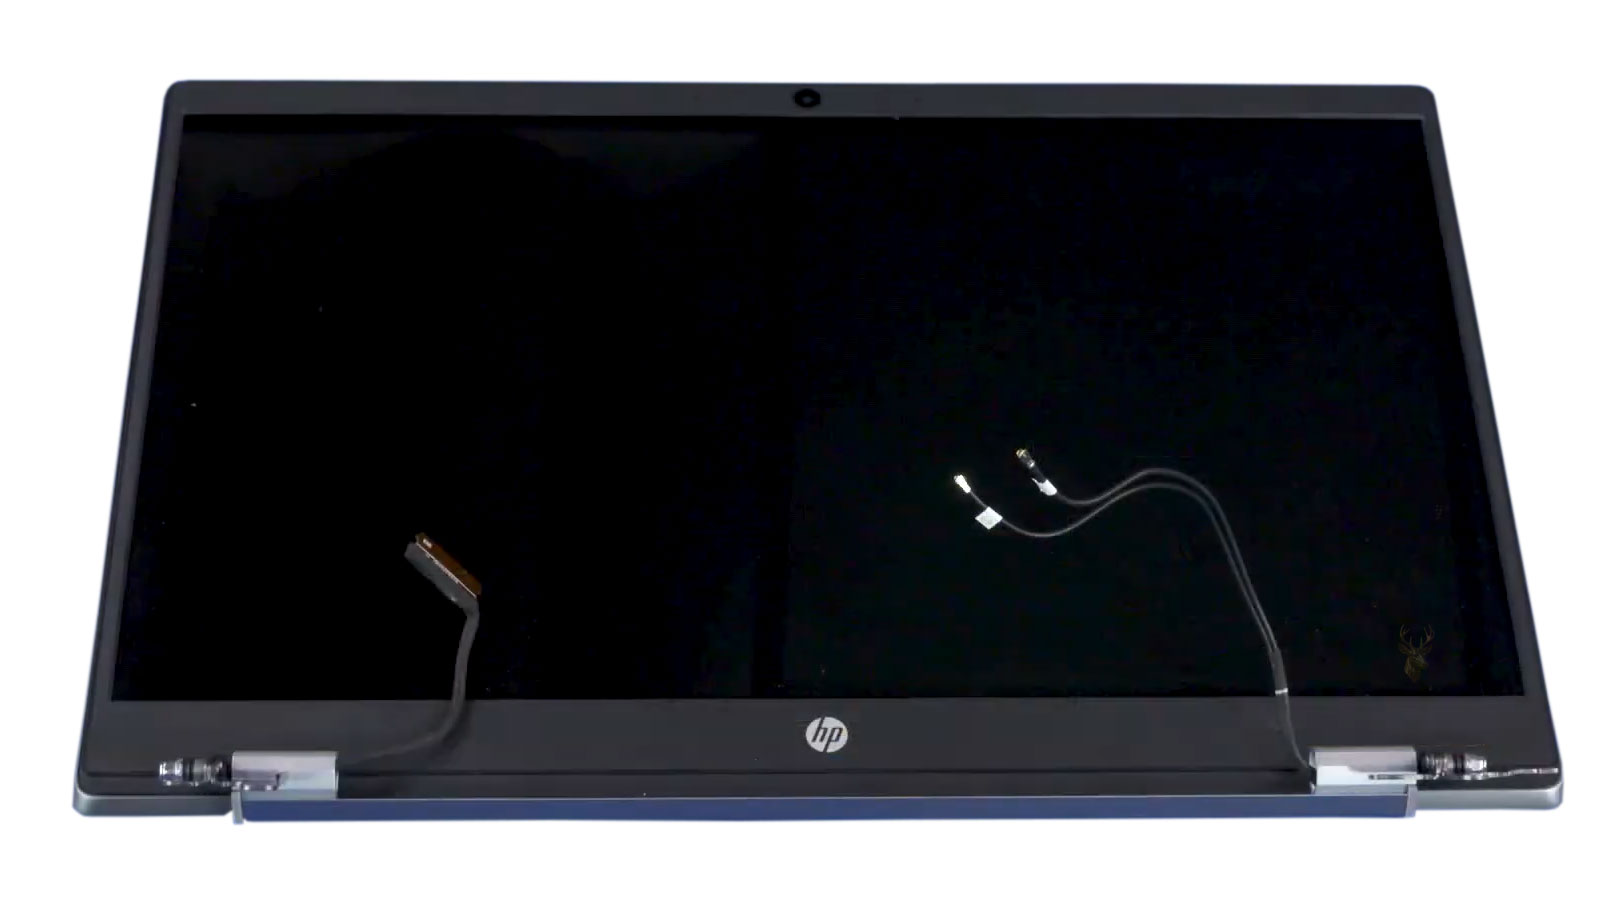
The bezel helps secure the display assembly, protects delicate components near the edges of the panel, supports devices such as webcams and microphones, and contributes to the structural rigidity of the entire display lid. Even a very thin bezel is engineered to work as part of the overall display assembly rather than simply covering unfinished edges.
Modern laptops place considerable emphasis on reducing overall size and weight. As bezels become narrower, manufacturers must carefully balance aesthetics with durability. Removing too much material may improve the appearance of the laptop but can reduce the amount of protection available for the display panel underneath.
The display bezel is part of the screen assembly, not simply a trim piece attached around the edges.
This is one reason damaged bezels should not always be dismissed as minor cosmetic issues. A crack near a hinge, mounting clip, or corner may affect how the display assembly opens and closes, even when the screen itself continues operating normally.
Protecting the Edges of the Display Panel
The outer edges of an LCD or OLED panel contain extremely delicate layers, driver circuitry, and bonded connections that are more vulnerable than the center of the display. The bezel helps shield these areas from direct contact during everyday handling.
When opening a laptop, many people naturally grip the upper corners of the screen. Without the surrounding bezel, pressure would be applied much closer to the active display area. Even moderate twisting or localized pressure can stress the panel and, over time, contribute to cracks or display defects.
The bezel also creates a small separation between the visible display area and external objects. During transport, this spacing helps reduce the likelihood that another object inside a bag will press directly against the active portion of the screen.
Although modern display glass is stronger than earlier generations, it remains susceptible to concentrated force. The bezel works together with the display lid to distribute pressure more evenly across the assembly instead of allowing it to focus on one small location.
Housing Important Built-In Components
Many of the components people use every day are actually mounted within the display bezel rather than inside the display panel itself. Depending on the laptop model, these may include webcams, microphones, ambient light sensors, infrared cameras for facial recognition, status LEDs, antennas, and wireless communication hardware.
Integrating these devices into the bezel allows manufacturers to position them where they function effectively while keeping the active display area unobstructed. As bezels have become thinner, fitting all of these components into a smaller space has become increasingly challenging.
Thin bezels require careful engineering.
Reducing the width of the bezel means finding room for cameras, microphones, antennas, wiring, mounting clips, and structural supports without increasing the overall size of the display assembly.
Some ultra-thin laptops relocate certain components because there is no longer enough space above the display. Others redesign camera modules or antenna layouts to fit within the reduced border while maintaining acceptable performance and reliability.
The placement of these components also affects repair procedures. A technician replacing a damaged bezel must often disconnect small cables or transfer camera modules, microphones, antenna brackets, or adhesive-backed parts from the original assembly. These pieces are designed to fit precisely within molded openings that align them with the display and the laptop lid.
If these components are not positioned correctly during reassembly, problems may appear even though the screen itself works normally. A webcam may become slightly misaligned, a microphone opening may be partially blocked, or wireless antennas may no longer follow the routing intended by the manufacturer.
Helping Maintain Display Lid Rigidity
The display lid is expected to remain relatively rigid while also being as thin and lightweight as possible. The bezel contributes to this balance by helping distribute forces across the front of the display assembly. Although it is not the primary structural component, it works together with the rear cover, internal brackets, and display panel to improve overall stiffness.
Opening a laptop by one corner instead of lifting from the center places uneven stress on the display assembly. A properly secured bezel helps spread some of that force across a larger area, reducing localized flexing that could otherwise affect the screen or mounting points.
As laptops become thinner, even small amounts of display flex become more noticeable. Engineers compensate by selecting different materials, reinforcing critical areas, and designing bezel attachment points that help maintain alignment without adding excessive weight.
The bezel helps the display assembly behave as a single unit rather than allowing individual parts to move independently.
Attachment Methods Have Changed Over Time
Older laptops frequently secured their bezels with numerous visible screws hidden beneath small rubber covers. Removing the bezel usually involved taking out these screws before carefully releasing a series of plastic clips around the perimeter.
Many modern laptops use concealed clips, double-sided adhesive, or a combination of both. This creates a cleaner appearance by eliminating visible fasteners, but it also changes how the bezel must be removed during repair. Excessive force or incorrect tools can easily crack thin plastic edges or break mounting clips.
Some premium laptops use very narrow bezels that rely heavily on precision-fit clips and adhesive rather than thicker mechanical fasteners. These assemblies often require careful heating or specialized opening tools to separate the bezel without damaging nearby components.
Not every broken clip creates an immediate problem.
However, multiple damaged clips can allow the bezel to separate slightly from the display lid, increasing movement each time the laptop is opened or closed. Over time, that extra movement may place additional stress on nearby components.
Cracked Bezels Can Affect More Than Appearance
A cracked bezel is often considered a cosmetic defect, but its location determines whether it may also affect the operation of the display assembly. Damage near the hinges, corners, or mounting clips can reduce the bezel’s ability to keep the display properly supported.
Repeated opening and closing of the laptop may cause a crack to spread gradually. Small pieces of plastic can loosen, clips may no longer hold securely, and additional pressure may be transferred to nearby parts of the display lid. In some cases, the bezel begins separating from the screen housing whenever the lid is opened.
The severity depends on the design of the laptop and the extent of the damage. A small crack along one edge may remain stable for years, while damage surrounding a hinge or structural mounting point may worsen with continued use.
| Bezel Area | Typical Purpose |
|---|---|
| Top edge | Supports webcams, microphones, and sensors. |
| Side edges | Protects display edges and helps secure the panel. |
| Bottom edge | Provides additional mounting support and cable routing. |
| Corner sections | Helps distribute stress during opening and closing. |
| Hinge area | Works with the display housing to resist repeated movement. |
Although the bezel itself does not generate the display image, it contributes to the protection, alignment, and long-term durability of the entire screen assembly. Understanding these functions helps explain why even seemingly minor bezel damage deserves closer inspection instead of being viewed as a purely cosmetic concern.
Bezel damage can also expose areas that were never intended to remain uncovered. Small cables, antenna leads, camera wiring, adhesive strips, and the edges of the display panel may become more vulnerable once the surrounding trim begins separating from the lid.
This exposure does not always produce an immediate failure. The laptop may continue operating normally while movement around the damaged area gradually places stress on nearby parts. Each time the screen is opened, closed, or carried, the loosened bezel may flex slightly and allow internal components to shift.
Hinge Problems Often Show Up Around the Bezel
The lower corners of the display assembly are especially important because they sit close to the hinges. When a hinge becomes stiff, loose, or partially detached from its mounting points, the bezel may begin lifting away from the display cover before the user notices a problem inside the hinge itself.
A common warning sign is a gap that opens near one corner whenever the laptop lid moves. The bezel may return to position after the screen is fully opened, making the damage appear minor. In reality, the movement can indicate that the hinge force is being transferred into the plastic trim and display housing.
Continuing to open the laptop in this condition can enlarge the crack, break additional clips, or pull mounting inserts away from the lid. In severe cases, the display cable or antenna wiring routed near the hinge may also be affected.
A bezel that separates during lid movement may be revealing a hinge problem rather than causing it.
This distinction matters during repair. Replacing only the bezel may improve the appearance temporarily, but the new part can crack again if the hinge remains too tight or the underlying mounting structure is damaged.
Thin Bezels Are Less Forgiving During Repair
Narrow display borders leave less material around clips, corners, and camera openings. This makes them more sensitive to twisting during removal. A tool inserted too deeply can contact the display panel, while pulling too quickly can tear adhesive or damage a cable hidden behind the trim.
Some bezels are designed for one-time installation and do not retain their original shape after removal. Adhesive may lose strength, thin plastic may warp, and clips may no longer hold as securely as before. In those situations, replacing the bezel instead of reusing it can provide a more reliable result.
The order of disassembly also varies between laptops. On one model, the bezel may release before the display panel is removed. On another, the hinge covers, rear display cover, or lower trim may need to be separated first. Treating every laptop the same increases the risk of damage.
Resistance during removal usually has a reason.
A hidden screw, adhesive strip, interlocking clip, or attached component may still be holding the bezel in place. Applying more force without identifying the attachment point can turn a small repair into a damaged display assembly.
Replacement Parts Must Match the Display Assembly
A replacement bezel must match more than the general laptop model. Manufacturers sometimes use different display assemblies within the same product line. Variations may include touchscreen and non-touchscreen versions, different webcam openings, alternate microphone positions, infrared sensors, privacy shutters, or changes in panel size.
A bezel that appears correct in photographs may not align with the original clips or camera module. The lower edge may use a different shape, the adhesive locations may not match, or the opening around the display may be slightly different.
Part numbers printed on the original bezel or display cover can help identify the correct replacement. The complete laptop model, product number, and display type may also be needed when several versions were produced.
| Compatibility Detail | Possible Difference |
|---|---|
| Camera opening | Standard webcam, infrared camera, or privacy shutter |
| Display type | Touchscreen or non-touchscreen assembly |
| Panel dimensions | Different border width or screen size |
| Attachment method | Clips, screws, adhesive, or a combination |
| Sensor locations | Microphones, light sensors, and status indicators |
Using the wrong part may leave gaps, block a sensor, press against the screen, or fail to secure the assembly properly. A bezel should sit evenly around the panel without requiring excessive pressure to make it fit.
Adhesive and Clips Need Proper Preparation
When adhesive is used, the mounting surfaces must be clean and free from old residue. Applying new adhesive over dust, broken foam, or uneven material can prevent the bezel from sitting flat. The part may appear secure at first and begin lifting after repeated lid movement.
Clips should be inspected before reassembly. A broken clip can remain lodged in the rear cover and interfere with the replacement bezel. Pressing the new part into place without removing damaged fragments may bend the trim or create uneven pressure near the display.
The bezel should be installed gradually around the perimeter rather than forced into place at one corner. This allows clips to align in sequence and reduces twisting across the front of the screen.
Final Testing Includes More Than Checking the Picture
After repair, the screen should be opened and closed several times while the bezel is observed closely. It should remain seated around the hinges, corners, and camera area without clicking, lifting, or shifting.
The webcam, microphones, wireless connection, light sensors, touchscreen functions, and facial recognition hardware should also be tested when present. These features may depend on components mounted within or behind the bezel.
The display should remain free from pressure marks, bright spots, flickering, or color changes. These symptoms can indicate that the bezel is pressing unevenly against the panel or that the display cable was disturbed during the repair.
Any hinge stiffness should be addressed before the laptop is returned to regular use. A properly installed bezel cannot remain secure if the display assembly is still being pulled apart by damaged or overly resistant hinges.
Laptop display bezels combine appearance, protection, alignment, and structural support in a single part. They shield delicate panel edges, hold cameras and sensors in position, help stabilize the display assembly, and cover the attachment points that keep the screen secured inside the lid.
Minor scratches may remain cosmetic, but cracks, lifting corners, broken clips, and movement near the hinges can indicate a larger problem. The condition of the bezel should be evaluated together with the hinges, rear display cover, panel mounting points, and internal wiring.
A correctly matched replacement, careful disassembly, proper adhesive preparation, and complete testing can restore the display assembly without placing unnecessary pressure on the screen. Treating the bezel as a functional part of the laptop rather than simple decoration leads to a more dependable repair.