The Case Power Button Is Only One Part of the Startup Circuit
Pressing the power button on a desktop computer does not directly send full electrical power to every component. The button briefly closes a low-voltage circuit connected to the motherboard, signaling the system to begin its startup sequence.
If the button, cable, connector, or motherboard header is damaged, the computer may not react even when the power supply and internal hardware remain functional. This can make a relatively small front-panel problem resemble a failed motherboard or power supply.
Understanding the difference between the external button and the internal startup circuit helps prevent unnecessary component replacement.
The Power Switch Connects to a Motherboard Header
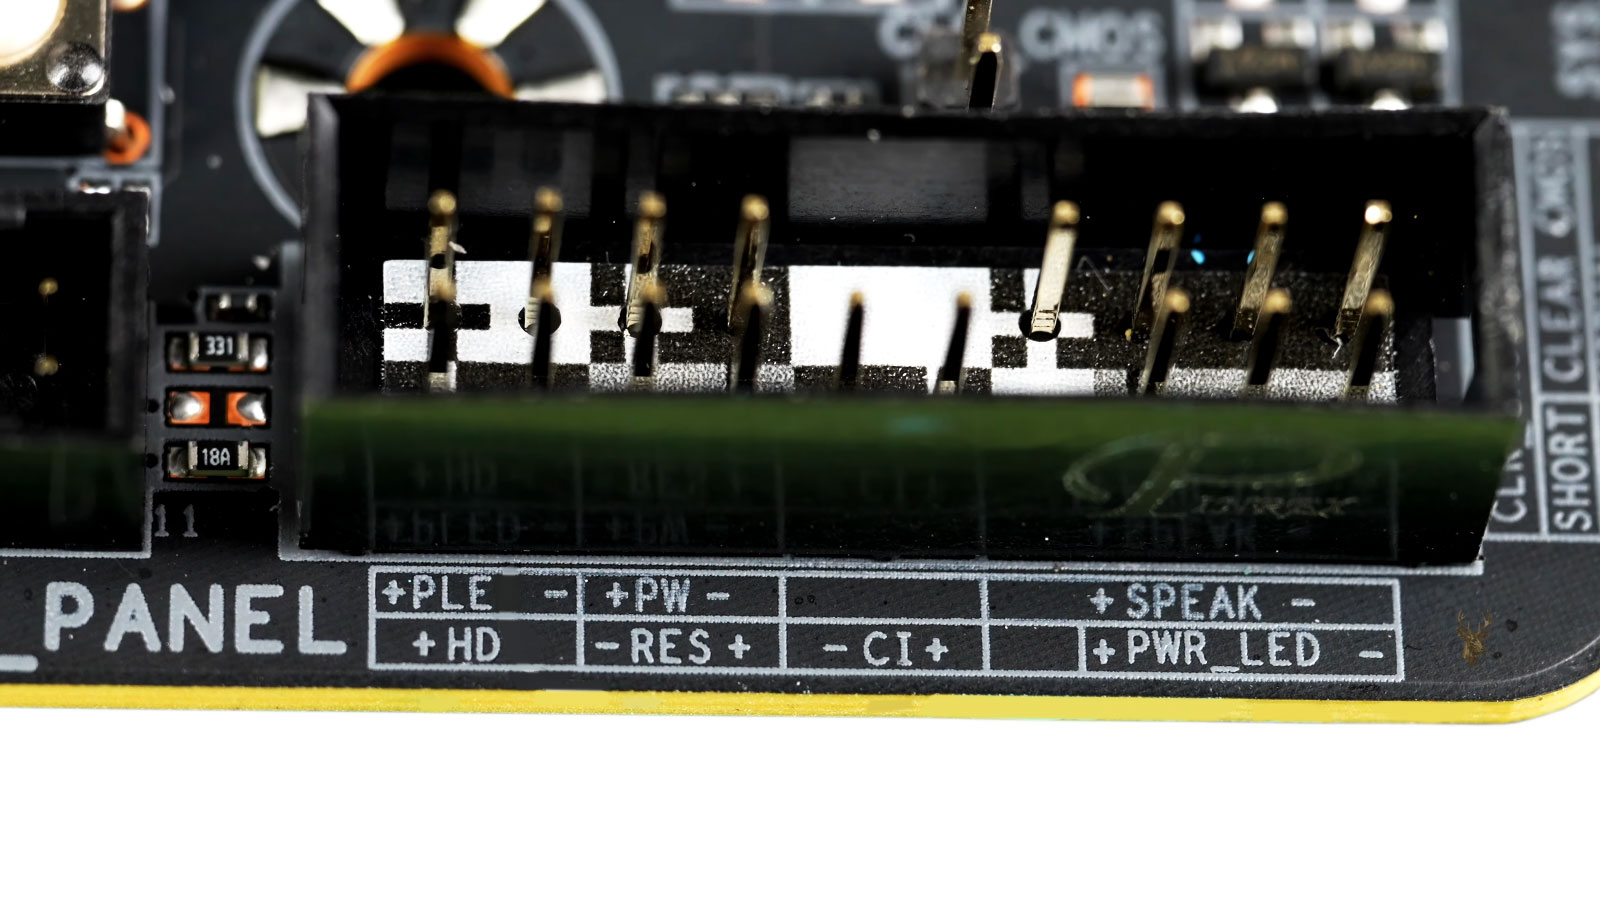
Most desktop cases contain a small momentary switch behind the external power button. Two thin wires run from that switch to a group of pins on the motherboard commonly called the front-panel header.
The switch closes only while the button is being pressed. After the motherboard detects that brief contact, it instructs the power supply to activate the computer.
| Front-Panel Connection | Typical Function |
|---|---|
| Power switch | Sends the startup or shutdown signal to the motherboard. |
| Reset switch | Restarts the computer without disconnecting power. |
| Power LED | Shows whether the computer is powered on. |
| Drive activity LED | Flashes when a storage device is being accessed. |
| Case speaker | Produces diagnostic beep codes on supported systems. |
A Failed Button Can Produce Several Different Symptoms
A damaged power switch does not always fail completely. The internal contact may become worn, contaminated, misaligned, or physically separated from the external button.
The symptoms can change depending on how much pressure is applied and whether the button mechanism returns to its normal position.
- The computer does nothing when the button is pressed.
- The system starts only after several attempts.
- The button must be pressed unusually hard.
- The computer starts when the button is pressed from one side.
- The button remains stuck inside the case.
- The computer turns off shortly after it starts.
A Stuck Power Button Can Force the Computer to Shut Down
Holding a desktop power button for several seconds normally forces the system to turn off. If the switch remains electrically closed because the button is stuck, the motherboard may interpret it as a continuous press.
The computer may start briefly and then shut down again. In other cases, it may repeatedly enter a startup and shutdown cycle until the switch is released or disconnected.
A computer that powers off several seconds after pressing the button may have a switch that is remaining closed instead of releasing normally.
The External Plastic Button Can Break Without Damaging the Electrical Switch
The visible button on the front of a desktop case is often a plastic piece that presses against a smaller internal switch. The plastic hinge, spring, guide, or retaining clip can break while the electrical switch remains functional.
When this happens, the button may feel loose, sink into the case, or fail to reach the switch behind it. Pressing the internal switch directly may start the computer, but doing so is normally a diagnostic step rather than a permanent repair.
| Button Behavior | Possible Cause |
|---|---|
| Button feels loose | A plastic hinge or retaining tab may be broken. |
| Button remains recessed | The return spring or guide may be damaged. |
| Button clicks but nothing happens | The electrical switch, cable, or connection may have failed. |
| Button works only at an angle | The plastic actuator may no longer align with the switch. |
| Button has no movement | The mechanism may be jammed by damage or debris. |
Loose Front-Panel Wiring Can Prevent Startup
The power-switch connector is small and can become loose during cleaning, hardware replacement, transportation, or work inside the case. A connector that shifts by only one set of pins may stop the button from communicating with the motherboard.
Front-panel connectors are frequently separated into several individual plugs. Their labels may be small, and the motherboard markings can be difficult to read once other components are installed.
- The power-switch plug may be disconnected completely.
- The connector may be installed on the wrong pins.
- One side of the plug may not be fully seated.
- The wire may be pinched between the case panels.
- A terminal may have pulled partly out of the plastic connector.
Incorrect Header Placement Can Follow a Motherboard Replacement
Motherboards do not all use the same front-panel pin arrangement. A case connector that fit one board may need to be positioned differently on another.
After a motherboard replacement or major rebuild, the power button may appear defective when the connector is simply attached to the reset-switch, LED, or unused pins.
The motherboard manual or printed header diagram should be checked rather than relying only on the previous connector position.
LED Polarity Does Not Apply to the Power Switch
Power and drive-activity LEDs normally require correct positive and negative orientation. A reversed LED connector may prevent the light from working.
The ordinary power switch is different. It simply closes two contacts, so reversing its two-wire connector generally does not prevent startup. Correct pin placement matters, but the direction of the plug usually does not.
| Connector | Does Polarity Normally Matter? |
|---|---|
| Power switch | No, but it must be connected to the correct two pins. |
| Reset switch | No, but it must use the correct header position. |
| Power LED | Yes, reversing it may prevent illumination. |
| Drive activity LED | Yes, the light may not work when reversed. |
A Damaged Wire Can Create an Intermittent Startup Problem
The thin wires between the case switch and motherboard can break internally while the outer insulation remains intact. Movement of the front panel or cable may temporarily restore contact.
This can cause the computer to start only when the case is touched, tilted, or pressed near the power button. A visual inspection alone may not reveal the broken conductor.
- Inspect the cable from the switch to the motherboard.
- Look for pinching, cuts, stretched sections, or sharp bends.
- Check whether the wires remain secure inside the connector.
- Move the cable gently while observing whether the switch behavior changes.
- Replace or electrically test the switch assembly when damage is suspected.
The Reset Button May Be Used During Diagnosis
Many desktop cases use similar momentary switches for both power and reset functions. During diagnosis, a technician may temporarily connect the reset-switch cable to the motherboard’s power-switch pins.
If the computer consistently starts from the reset button, the original power-switch mechanism or its wiring becomes a stronger suspect. This test should be documented so the connectors can be returned to their intended positions.
Testing the Motherboard Pins Can Separate the Case From the Computer
A technician can briefly close the correct motherboard power-switch pins with an appropriate conductive tool. This duplicates the action of the case button without using the front-panel switch.
If the computer starts reliably through the motherboard pins but not from the case button, the problem is likely within the button, cable, or connector. If there is still no response, the diagnosis must continue beyond the front panel.
Directly testing the correct power-switch pins can identify whether the startup failure is inside the case controls or elsewhere in the computer.
Direct Pin Testing Requires Accurate Identification
The motherboard contains many exposed pins, and touching the wrong ones can create a short circuit or damage a component. The power-switch pins must be identified from the board labeling or manufacturer documentation before any direct test is attempted.
The tool should contact only the intended pair of pins and only long enough to simulate a normal button press. This procedure is best performed by someone familiar with desktop motherboard layouts.
A Working Button Does Not Prove That the Power Supply Is Functional
When the computer does not start, the front-panel switch is only one possibility. The power supply may lack input power, remain switched off, have a loose motherboard connection, or be unable to provide standby voltage.
The motherboard also requires standby power before it can recognize the button press. A functional switch cannot start a system that is not receiving the required electrical supply.
| Observation | What It May Suggest |
|---|---|
| No lights or response from any component | Input power, power supply, motherboard, or switch failure. |
| Motherboard standby light is present | Some standby power is reaching the board. |
| System starts from motherboard pins | The case switch or wiring may be defective. |
| System does not start from motherboard pins | The problem likely extends beyond the case button. |
| Computer starts and immediately shuts down | A stuck switch or another hardware fault may be present. |
Case Damage Can Shift the Button Away From the Internal Switch
A dropped desktop, bent front panel, broken bezel, or incorrectly installed cover can move the external button away from the electrical switch. The button may look normal from the outside while no longer pressing the switch far enough.
Removing the front bezel can reveal cracked mounts, displaced plastic guides, or a switch that has detached from its holder.
A Careful Startup Diagnosis Prevents Unnecessary Part Replacement
A nonresponsive desktop should not automatically be assumed to have a failed power supply or motherboard. The external button, internal switch, cable, connector, and motherboard header form a separate control path that can fail independently.
Checking the button feel, front-panel wiring, connector placement, and response from the motherboard pins can narrow the problem before larger components are replaced.
The Power Button Can Fail Only at Certain Temperatures
A worn switch may behave differently when the computer is cold, warm, or recently powered off. Internal metal contacts can expand slightly with temperature, and a weak connection may work only under certain conditions.
This can create a pattern in which the computer starts normally after running but refuses to respond after sitting overnight. The opposite can also occur when heat causes a damaged switch or connector to lose contact.
- The button works only after several rapid presses.
- The computer starts more easily when the room is warm.
- The switch fails after the system has been running for hours.
- Light pressure works at one time but not another.
- Moving the front panel changes the response.
Debris Around the Button Can Restrict Its Movement
Dust, hair, food particles, sticky residue, and small pieces of broken plastic can collect around the front-panel button. The external button may no longer move far enough to activate the internal switch or may remain partially depressed after it is released.
Cleaning should be performed carefully because liquid cleaners can enter the switch assembly or nearby front-panel electronics. Forcing the button can break its plastic guides or mounting clips.
| Observed Condition | Possible Effect |
|---|---|
| Sticky residue | The button may return slowly or remain depressed. |
| Heavy dust buildup | The switch travel may become restricted. |
| Broken plastic fragments | The actuator may jam or press the switch unevenly. |
| Bent front bezel | The button may rub against the surrounding opening. |
Some Desktop Cases Use a Small Circuit Board Behind the Front Panel
Not every case connects the power button directly to the motherboard with a simple two-wire switch. Some systems use a small front-panel circuit board that also controls indicator lights, USB ports, audio jacks, lighting, or proprietary buttons.
A failure on this board can interrupt the startup signal even when the external button still feels normal. Liquid exposure, cracked solder joints, damaged connectors, or failed components may affect several front-panel functions at once.
- The power button stops working together with front USB ports.
- Indicator lights flicker or remain off.
- The front audio jacks fail at the same time.
- The button works only when the front panel is pressed or moved.
- A ribbon cable connects the panel to the motherboard instead of separate plugs.
Proprietary Computers May Use Combined Front-Panel Connectors
Some factory-built desktops use one combined connector for the power switch, lights, speaker, and other case functions. The pin arrangement may differ from the common individual connectors found in standard computer cases.
Replacing the motherboard or moving the case wiring to another system may require an adapter or verified wiring diagram. Connecting a proprietary plug by appearance alone can place signals on the wrong pins.
A connector that physically fits a motherboard header is not necessarily wired for the same pin arrangement.
The Power Switch Cable Can Be Damaged During Case Disassembly
Front bezels are often removed during cleaning, fan replacement, drive installation, or access to hidden screws. Pulling the bezel away without checking the attached wires can stretch or tear the power-switch cable.
A damaged cable may remain connected externally while one conductor has separated inside the insulation or at the switch terminal.
- Inspect how the cable is routed through the front of the case.
- Check whether it was pinched during reassembly.
- Look for strain near the switch and motherboard connector.
- Confirm that terminals remain locked inside the plug.
- Test continuity when the visible condition is inconclusive.
Continuity Testing Can Confirm Whether the Switch Closes
A momentary power switch can be tested with a multimeter after it is disconnected from the motherboard. The meter should show an open circuit while the button is released and continuity only while the button is pressed.
An inconsistent reading can indicate worn contacts, a broken wire, or a switch that does not close reliably. The test should be repeated while the cable is moved gently to reveal intermittent internal damage.
| Switch Position | Expected Reading |
|---|---|
| Button released | Open circuit or no continuity. |
| Button pressed | Continuity across the two switch wires. |
| Button pressed with unstable reading | Possible worn contacts or damaged wiring. |
| Continuity remains after release | The switch may be stuck closed. |
A Shorted Switch Can Cause Unexpected Power Behavior
If the power-switch wires become pinched together or the switch remains electrically closed, the motherboard may receive a constant power-button signal. The computer can shut down after several seconds, restart unexpectedly, or refuse to remain on.
Disconnecting the front-panel power-switch plug temporarily can help determine whether the repeated signal is coming from the case controls. The system can then be tested through the motherboard pins by a qualified technician.
Power Button Settings in Windows Affect What Happens After Startup
Once the computer is running, Windows can assign different actions to a brief press of the power button. Depending on the configuration, the system may shut down, sleep, hibernate, or do nothing.
These settings do not normally prevent a powered-off computer from starting. However, they can confuse diagnosis when the button starts the system correctly but appears to behave incorrectly while Windows is already running.
| Button Action in Windows | Typical Result |
|---|---|
| Shut down | A brief press begins a controlled shutdown. |
| Sleep | The computer enters a low-power state. |
| Hibernate | The current session is saved to storage before power is reduced. |
| Do nothing | A brief press has no assigned Windows action. |
| Long press | The motherboard may force the computer off regardless of Windows settings. |
Sleep and Shutdown Problems Can Be Mistaken for a Bad Button
A computer may appear not to respond to the power button when it is actually trapped in a failed sleep, hibernation, or shutdown state. Fans, lights, or USB power may remain active even though the monitor is blank.
In this condition, the button and switch may be working correctly, but the motherboard or operating system is not completing the requested transition.
- The power light remains on while the display stays black.
- A brief press does nothing, but a long press turns the system off.
- The computer starts normally only after power is fully removed.
- Fans continue running after Windows appears to shut down.
- The issue occurs only after sleep or hibernation.
Motherboard Firmware Can Control Power Button Timing
The motherboard firmware interprets the power-switch signal before Windows starts. Firmware settings and hardware behavior determine how long the button must be pressed and what happens during certain startup or shutdown conditions.
A firmware problem is less common than a loose connector or damaged switch, but it may be considered when the physical button tests correctly and the motherboard reacts inconsistently.
Standby Power Must Reach the Motherboard Before the Switch Can Work
Even when the computer appears fully off, the power supply normally provides a small standby voltage to the motherboard. This allows the board to detect the front-panel power-switch signal.
If standby power is missing, pressing the button produces no response. The cause may involve the wall outlet, power cable, surge protector, rear power-supply switch, internal power connections, or the power supply itself.
The power button cannot start the computer unless the motherboard is already receiving the required standby voltage.
Motherboard Standby Lights Can Provide a Useful Clue
Some motherboards include a small light that turns on when standby power is present. Its presence can confirm that at least part of the power supply is reaching the board, but it does not prove that every voltage or motherboard circuit is working correctly.
The absence of a light is also not conclusive because many motherboards do not include one or may disable decorative lighting while powered off.
A Failed Power Supply Can Still Produce Lights
A desktop may show motherboard lighting, network-port lights, or powered USB devices while still refusing to start. A power supply can provide standby voltage but fail when asked to activate its main output rails.
For this reason, visible lights should not be used as the only evidence that the power supply is healthy.
| Observation | What It Confirms | What It Does Not Confirm |
|---|---|---|
| Motherboard light is on | Some standby power is present. | The power supply can operate under load. |
| USB device receives power | A standby circuit is active. | The motherboard can complete startup. |
| Fans twitch briefly | The system attempted to start. | The front-panel switch is the cause. |
| No visible lights | No obvious standby indication exists. | The switch has definitely failed. |
Repeated Pressing Can Hide the Original Failure Pattern
Pressing the button many times may eventually start a computer with an intermittent switch, but it can make the behavior harder to diagnose. Each attempt may move a loose connector, flex a broken wire, or temporarily clean worn electrical contacts.
Recording whether the button clicked, how long it was pressed, and whether lights or fans reacted can provide more useful information than repeated uncontrolled attempts.
Replacement Switches Must Fit the Case Mechanism
The electrical function of many desktop power switches is simple, but the physical mounting can vary widely. Replacement parts may differ in button height, bracket shape, wire length, connector size, and the way they attach behind the front panel.
A switch that works electrically may still fail to align with the external case button. The complete switch-and-button assembly may need to be replaced when the plastic mounting structure is damaged.
A Temporary External Switch Should Not Become an Unsafe Permanent Repair
External test switches can be connected to the motherboard header during diagnosis or used when a replacement case part is unavailable. Any permanent installation should be insulated, secured, and routed so the wiring cannot contact fans, sharp metal, or other motherboard pins.
Loose wires hanging outside the case or an exposed metal contact can create new electrical and mechanical risks.
Comparing the Button Test With Other Power Checks Narrows the Cause
The most useful diagnosis compares the response from the case button with the response from the motherboard power-switch pins. That result can then be considered alongside standby power, power-supply behavior, motherboard indicators, and internal power connections.
This method separates a front-panel failure from a broader startup problem and reduces the chance of replacing an expensive component because of a small switch or cable defect.
Front USB or Audio Damage Can Affect the Power Button Assembly
On some desktop cases, the power switch shares a mounting bracket, cable bundle, or circuit board with the front USB and audio ports. Damage in one area can place stress on the entire front-panel assembly.
A bent USB port, liquid spill, broken headphone jack, or cracked front bezel may therefore be connected to a startup problem even when the power button itself looks undamaged.
- Inspect the complete front-panel assembly rather than only the visible button.
- Check for damaged USB ports or loose metal contacts.
- Look for corrosion, residue, or cracked solder joints.
- Confirm that ribbon cables and combined connectors are fully seated.
- Test whether other front-panel functions fail at the same time.
A Shorted Front USB Port Can Prevent Normal Startup
A damaged front USB port can contain bent contacts that touch the metal housing or each other. Depending on the motherboard design, the short may interrupt startup, cause the power supply to shut down immediately, or create repeated power cycling.
Disconnecting the front USB header during diagnosis can help separate a port short from a failed power switch. Each connector should be labeled before removal so it can be restored correctly.
| Front-Panel Fault | Possible Startup Effect |
|---|---|
| Stuck power switch | The computer may start and then shut down. |
| Disconnected power-switch cable | The button may produce no response. |
| Shorted USB port | The system may fail to start or power off immediately. |
| Damaged front-panel circuit board | Several buttons, lights, and ports may fail together. |
| Loose ribbon cable | Front-panel functions may work intermittently. |
Case Lighting Controllers Can Complicate Power Diagnosis
Modern gaming and custom desktop cases may route the power button, reset button, lighting controls, and fan controls through a hub or controller. A failed controller or incorrect connection can make the front-panel behavior difficult to interpret.
The lighting may continue working even when the power-switch signal is not reaching the motherboard. In other cases, a reset button may be reassigned to control lighting and no longer function as a normal reset switch.
The Reset Switch Can Also Fail in the Closed Position
A stuck or shorted reset switch can prevent a desktop from completing startup. The system may repeatedly restart, display only a brief flash of power, or remain trapped before the operating system loads.
Disconnecting the reset-switch connector temporarily can help identify this condition. A reset-button failure may otherwise be mistaken for a defective power button, motherboard, or power supply.
The power switch is not the only front-panel control capable of interrupting startup.
Power Cycling Can Result From More Than One Fault
A computer that repeatedly starts and stops may have a stuck power switch, shorted reset switch, unstable power supply, motherboard fault, overheating protection problem, or improperly seated hardware.
The front-panel connectors should be isolated one at a time rather than assuming the visible power button is responsible for every repeated shutdown.
- Disconnect the power-switch and reset-switch connectors after documenting their positions.
- Inspect the front USB and audio headers for damage.
- Test startup through the correct motherboard pins.
- Observe whether the system remains powered on.
- Reconnect each front-panel function individually.
- Continue with power-supply and motherboard testing if the behavior remains unchanged.
Transportation Can Loosen Small Front-Panel Connectors
Desktop computers may be moved during office relocation, cleaning, repair, or furniture changes. Vibration and case flex can loosen small front-panel plugs, especially when the wiring was already under tension.
A system that worked before transportation but no longer responds to the button should be checked for displaced connectors before major parts are replaced.
Internal Cable Management Can Pull on the Switch Wiring
Tight cable ties and bundled wiring can place continuous tension on the small power-switch cable. Opening or closing the side panel may pull the connector partially off the motherboard header.
The cable should have enough slack to remain secure without touching fans or sharp case edges. Excessive tension can damage the wire where it enters the connector even when the plug appears seated.
| Cable Condition | Possible Consequence |
|---|---|
| Too tightly bundled | The connector may be pulled loose. |
| Routed across a sharp edge | The insulation or conductor may become damaged. |
| Placed near a fan | The wire can be cut or caught by moving blades. |
| Excessively loose | The cable may shift during transport or servicing. |
| Pinched behind a panel | The conductor may break internally. |
Replacing the Entire Front Bezel May Be More Practical
Some manufacturers do not sell the power switch separately. The button, cable, indicator lights, and front bezel may be supplied as one assembly.
Replacing the complete assembly can be more reliable than attempting to repair cracked plastic mounts or damaged proprietary wiring. Availability may depend on the exact computer model and case revision.
A Generic Momentary Switch Can Work Electrically but Fit Poorly
Many standard motherboards require only a basic normally open momentary switch. A generic replacement may therefore operate the computer correctly when connected to the proper pins.
The challenge is often mechanical rather than electrical. The switch must be mounted securely, positioned where it can be pressed safely, and insulated from the metal case and nearby components.
The Computer Should Be Disconnected Before Front-Panel Work
Standby voltage can remain present inside a desktop even when the computer appears off. The power cable should be disconnected before front-panel connectors, switches, or circuit boards are removed or repositioned.
After external power is removed, the power button may be pressed briefly to help discharge remaining energy. Static precautions should also be used around the motherboard and exposed connectors.
- Shut down the computer normally when possible.
- Turn off the rear power-supply switch if one is present.
- Disconnect the power cable from the computer.
- Press the case power button briefly after unplugging.
- Use appropriate static protection before touching the motherboard.
Photographs Help Prevent Front-Panel Wiring Errors
Front-panel header labels can be small, partially hidden, or difficult to interpret. Taking a clear photograph before disconnecting the wires provides a reference during reassembly.
The photograph should show the connector labels, pin positions, and cable orientation. A written diagram can provide additional protection when several similar plugs are present.
Post-Repair Testing Should Include Short and Long Button Presses
After the switch or front-panel assembly is repaired, the computer should be tested through several complete startup and shutdown cycles. A single successful start may not reveal an intermittent connection.
| Test | Expected Result |
|---|---|
| Brief press while powered off | The computer begins a normal startup. |
| Brief press in Windows | The configured operating-system action occurs. |
| Button release | The switch returns immediately without sticking. |
| Several cold starts | The system responds consistently each time. |
| Gentle front-panel movement | Startup behavior remains stable. |
| Controlled long press | The motherboard recognizes the forced shutdown command. |
The Power LED Should Be Checked Separately
A computer can start normally even when the power indicator remains dark. A failed LED, reversed connector, damaged wire, or incorrect header placement may create the impression that the system did not power on.
The actual startup state should be confirmed through fan movement, display output, storage activity, and operating-system response rather than relying only on the front light.
Professional Testing Is Appropriate When the Cause Remains Unclear
If the computer does not respond from either the case button or the motherboard pins, the diagnosis should continue with the power supply, standby voltage, motherboard power connections, processor power cable, and possible board faults.
Electrical measurements and direct motherboard testing require accurate pin identification and careful handling. Incorrect testing can create a short circuit or damage components that were previously functional.
A Small Switch Can Cause a Complete Startup Failure
The desktop power button is a simple control, but it forms the first link in the startup process. A broken actuator, worn switch, damaged cable, loose connector, front-panel short, or incorrect motherboard connection can prevent an otherwise functional computer from turning on.
A complete diagnosis compares the response from the case controls with direct motherboard testing and verifies that standby power is present. This separates a small front-panel failure from a larger power-supply or motherboard problem and helps ensure that only the necessary parts are repaired or replaced.