A Spinning Cooling Fan Does Not Always Mean the Laptop Is Cooling Properly
Many laptop owners assume that an overheating problem cannot exist if the cooling fan is clearly spinning. They hear air moving, notice that the fan speeds up under heavy workloads, and conclude that the cooling system is operating correctly. However, the fan is only one part of the laptop’s thermal management system. Heat must travel efficiently from the processor and graphics components through the heatsink before the fan can remove it from the computer.
A fan may operate exactly as designed while the processor continues reaching unusually high temperatures. Dust buildup, blocked exhaust fins, deteriorated thermal compound, damaged heat pipes, restricted airflow, or excessive internal heat production can all reduce cooling performance even though the fan itself never stops turning.
Understanding how each cooling component works together helps explain why replacing the fan alone does not always solve overheating complaints.
Laptop Cooling Depends on Several Components Working Together
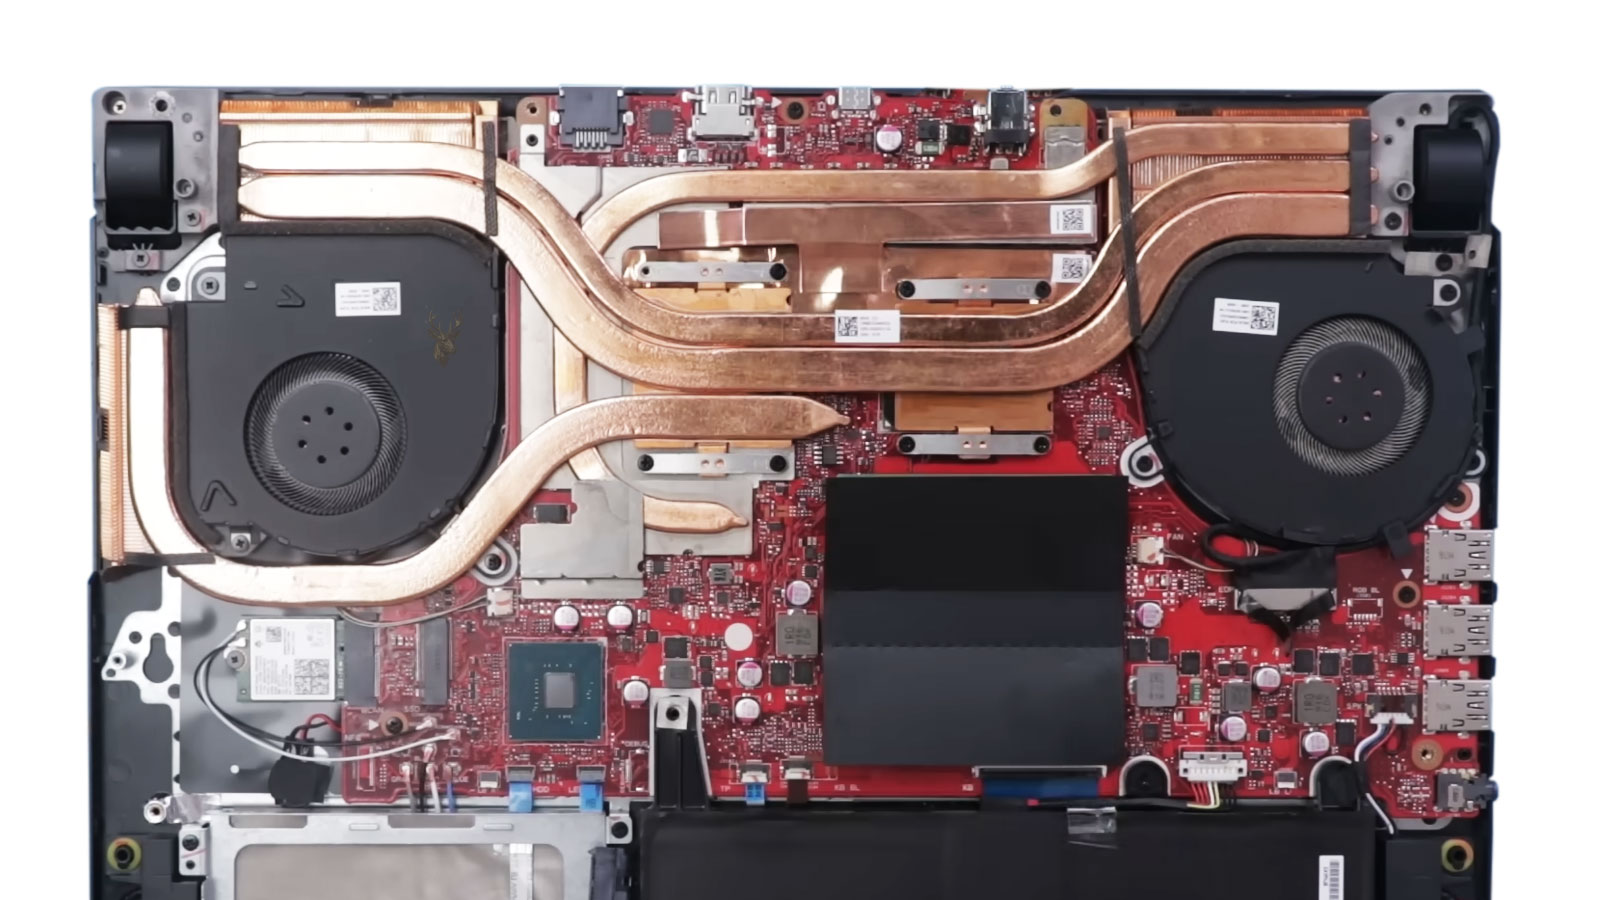
A typical laptop cooling system transfers heat away from the processor through a carefully designed path. The processor generates heat, thermal compound transfers that heat into the heatsink, heat pipes carry it toward cooling fins, and the fan pushes air through those fins before the warmed air exits the computer.
If any part of this chain becomes less effective, processor temperature can rise even while the fan appears to function normally.
| Cooling Component | Primary Purpose |
|---|---|
| Processor | Generates heat while performing work |
| Thermal compound | Transfers heat into the heatsink |
| Heat pipe | Moves heat toward the cooling fins |
| Cooling fins | Provide surface area for heat dissipation |
| Cooling fan | Moves air through the heatsink and out of the laptop |
The failure of any one component can reduce the effectiveness of the entire cooling assembly.
Blocked Cooling Fins Can Trap Heat Inside the Laptop
One of the most common overheating causes is not a failed fan but a blockage between the fan and the heatsink fins. Dust can accumulate into a dense layer that prevents air from passing through the narrow cooling passages.
From outside the computer, the fan may sound perfectly normal because it continues spinning. Internally, however, very little air reaches the heatsink, allowing heat to remain trapped around the processor.
- The fan may become louder without improving cooling.
- Processor temperature may rise rapidly during light workloads.
- The laptop exterior may become unusually warm.
- Performance may decrease because of thermal throttling.
- Unexpected shutdowns may occur during demanding applications.
Cleaning only the visible fan blades may leave the actual airflow restriction untouched if dust remains packed inside the heatsink.
Heat Pipes Move Thermal Energy Away From the Processor
Most laptops use sealed heat pipes that rapidly transfer heat from the processor to the cooling fins. These pipes contain a small amount of working fluid that repeatedly evaporates and condenses as heat moves through the system.
Although heat pipes are generally reliable, physical damage or manufacturing defects can reduce their efficiency. When this occurs, the processor area may become extremely hot while the cooling fins remain comparatively cool because heat is no longer reaching them effectively.
A properly spinning fan cannot remove heat that never reaches the heatsink.
Thermal Compound Ages Over Time
The thermal compound between the processor and the heatsink gradually changes as the laptop experiences years of heating and cooling cycles. Depending on the material, operating environment, and service history, the compound may become less effective at transferring heat.
Reduced thermal transfer causes processor temperatures to rise more quickly under identical workloads, even though every cooling fan continues operating normally.
| Condition | Possible Cooling Effect |
|---|---|
| Fresh thermal compound | Supports efficient heat transfer |
| Aged compound | May reduce cooling efficiency over time |
| Uneven application | Can leave small gaps between surfaces |
| Contaminated contact area | May interfere with heat movement |
| Improper heatsink installation | Reduces overall thermal contact |
Replacing thermal compound should be performed carefully because correct heatsink alignment and mounting pressure are equally important.
Soft Surfaces Can Restrict Laptop Airflow
Many laptops draw cooling air through intake openings on the bottom of the chassis. Using the computer on blankets, beds, couches, pillows, or thick carpeting can block these openings and reduce the amount of cool air reaching the fan.
Even a powerful cooling fan cannot compensate for intake vents that have been covered during normal use.
- Place the laptop on a firm, flat surface.
- Keep intake openings free of obstructions.
- Maintain clearance around exhaust vents.
- Avoid covering ventilation openings during extended workloads.
- Monitor temperatures after improving airflow.
Simple changes to placement can noticeably improve cooling without replacing any hardware.
High Ambient Temperatures Reduce Cooling Efficiency
Laptops cool themselves by transferring heat into the surrounding air. When room temperature increases, the difference between processor temperature and incoming air becomes smaller, making heat removal less efficient.
A laptop that performs normally in an air-conditioned office may operate much warmer in direct sunlight, inside a vehicle, or in a room with poor ventilation.
- Warm rooms reduce cooling capacity.
- Direct sunlight increases chassis temperature.
- Enclosed desks can trap warm exhaust air.
- Nearby heat sources may affect airflow temperature.
- Seasonal temperature changes influence cooling performance.
Environmental conditions should always be considered before concluding that an internal cooling component has failed.
Thermal Throttling May Be the First Sign of Reduced Cooling
Modern processors reduce clock speed automatically when temperatures approach safe operating limits. This protective behavior, known as thermal throttling, helps prevent damage but also reduces system performance.
Users often notice slower application performance before they notice excessive heat. Games may lose frame rate, video rendering may take longer, and demanding software may become less responsive as processor speed is reduced to control temperature.
| Observed Behavior | Possible Explanation |
|---|---|
| Slower performance under load | Processor may be reducing clock speed |
| Fan remains loud continuously | Cooling system is attempting to remove excess heat |
| Warm keyboard area | Heat is accumulating near internal components |
| Performance improves after cooling | Thermal limits may have been reached |
| Unexpected shutdown | Protective thermal shutdown may have occurred |
Recognizing these early symptoms allows overheating problems to be investigated before they become more severe.
A Fan Can Spin at the Wrong Speed
A laptop fan may rotate normally while still failing to move enough air. Worn bearings, electrical resistance, control problems, or a replacement fan with different specifications can reduce its operating speed even though the blades remain visibly active.
This can be difficult to recognize without comparing the reported fan speed, airflow, and processor temperature under the same workload. A fan that spins slowly may sound quieter than expected while the computer becomes progressively hotter.
- The fan may start but never reach its intended maximum speed.
- Speed may fluctuate even when temperature remains high.
- A replacement fan may use a different control range.
- Damaged wiring can interfere with power or speed reporting.
- Firmware may limit the fan because of an incorrect sensor reading.
Visual movement confirms only that the fan motor is receiving some power. It does not confirm that the fan is delivering the airflow required by the laptop design.
Replacement Fans Must Match More Than Their Physical Shape
A cooling fan that fits inside the chassis is not automatically an exact replacement. Laptop fans can differ in voltage, current, connector wiring, blade design, maximum speed, control method, and airflow direction.
An incorrect fan may install successfully and begin spinning, yet provide less airflow or respond improperly to motherboard commands.
| Replacement Detail | Reason It Matters |
|---|---|
| Part number | Helps identify the intended fan assembly |
| Voltage rating | Must match the laptop’s power requirements |
| Connector wiring | Controls power, ground, speed reporting, and regulation |
| Blade and housing design | Determines airflow through the original cooling path |
| Maximum RPM | Affects cooling capacity under heavy load |
Comparing only the connector and screw locations can result in a fan that appears compatible but performs below the required level.
Fan Housing Gaps Can Allow Air to Escape
The fan housing is designed to direct air through the heatsink fins. Foam seals, tape, plastic channels, and fitted covers help prevent the air from escaping into the surrounding chassis.
If these seals are missing, torn, or incorrectly positioned after a repair, the fan may spin at full speed while much of the airflow bypasses the heatsink.
- Inspect the original foam and adhesive seals.
- Confirm that the fan housing sits flush against the heatsink.
- Check for gaps created by bent plastic or missing screws.
- Verify that the bottom cover does not disturb the airflow channel.
- Test exhaust airflow after reassembly.
Small air leaks can reduce cooling efficiency because laptop thermal systems depend on narrow, controlled airflow paths.
Heatsink Mounting Pressure Must Be Even
Laptop heatsinks are commonly secured by several numbered screws. These screws are intended to be tightened gradually and in sequence so pressure is distributed evenly across the processor and graphics components.
Tightening one side completely before the others can tilt the heatsink or leave uneven contact. A screw that is cross-threaded, missing, or unable to tighten fully can also reduce thermal transfer.
A correctly installed fan cannot compensate for a heatsink that is not seated evenly.
The mounting order printed on the heatsink should be followed during removal and installation whenever possible.
Thermal Pads Must Match the Original Thickness
Some laptop cooling assemblies use thermal pads on graphics memory, voltage regulators, chipsets, or other components. These pads are available in different thicknesses and must maintain contact without lifting the heatsink away from the processor.
A replacement pad that is too thick can prevent the main heatsink plate from sitting flat. A pad that is too thin may fail to contact the component it is intended to cool.
| Thermal Pad Condition | Possible Result |
|---|---|
| Correct thickness | Maintains contact without disturbing heatsink alignment |
| Too thick | May lift the heatsink away from the processor |
| Too thin | May leave an air gap above the component |
| Torn or displaced | Can reduce cooling of memory or power components |
| Missing pad | May allow localized overheating |
Thermal pads should not be replaced casually with compound because the original gap and contact method may require a compressible material.
A Shared Heatsink Can Transfer Heat Between the CPU and Graphics Processor
Many laptops use one cooling assembly for both the processor and the graphics chip. Heat pipes connect both components to the same fin stack and fan.
During gaming or graphics-intensive work, heat from the graphics processor can raise the temperature of the entire assembly. The processor may then run hotter even if its own workload has not increased substantially.
- CPU and graphics temperatures may rise together.
- One blocked fin stack can affect both components.
- Poor contact on either chip can disturb heatsink alignment.
- A failing heat pipe can reduce cooling across the shared assembly.
- Heavy graphics use may keep the fan at high speed for extended periods.
Testing only the processor may not reproduce overheating that occurs during combined CPU and graphics workloads.
High Processor Usage Can Overwhelm a Healthy Cooling System
A cooling system may be working normally while software keeps the processor under an unusually heavy load. Malware scans, operating-system updates, browser processes, cloud synchronization, damaged applications, and background indexing can keep temperatures elevated for long periods.
Before disassembling the laptop, processor usage should be checked while the computer is supposedly idle.
- Open the system’s task-management utility.
- Sort active processes by processor usage.
- Identify whether the activity is temporary or continuous.
- Allow legitimate maintenance tasks to finish.
- Recheck temperature after the workload returns to normal.
A laptop cannot remain cool if software continuously demands near-maximum processor performance, even when the fan and heatsink are functioning correctly.
Performance Modes Increase Heat Production
Manufacturer utilities often provide quiet, balanced, performance, or turbo modes. These profiles can change processor power limits, graphics performance, fan response, and battery behavior.
A performance profile may allow the processor to use more power for longer periods. The fan can spin correctly and still struggle because the laptop is producing more heat than it would under a balanced setting.
| Operating Profile | Typical Thermal Behavior |
|---|---|
| Quiet | Reduces performance or delays fan acceleration to lower noise |
| Balanced | Attempts to balance responsiveness, heat, and fan noise |
| Performance | Allows higher power use and earlier fan acceleration |
| Turbo | May maintain maximum performance and cooling noise |
| Battery saver | Restricts performance to reduce power use and heat |
Temperature comparisons should be performed using the same power profile and charger condition.
Using the Charger Can Change Thermal Behavior
Many laptops allow higher processor and graphics performance while connected to the charger. On battery power, the system may reduce clock speeds and power consumption to extend runtime.
A laptop that remains cool on battery but overheats while plugged in may be responding to higher performance limits rather than a fan that suddenly stops working.
- Processor boost may remain active longer while charging.
- Dedicated graphics may become available only on external power.
- Battery charging itself creates additional internal heat.
- Manufacturer performance software may switch profiles automatically.
- An incorrect high-wattage setting may increase power demand.
Testing should include both battery and charger operation so the condition that triggers the overheating can be identified.
Battery Heat Can Add to the Internal Temperature
A battery produces heat while charging and during heavy discharge. In thin laptops, the battery may be positioned close to the motherboard, storage drive, or cooling intake.
An aging or damaged battery can become warmer than expected and raise the internal temperature around nearby components. Swelling can also distort the chassis and reduce airflow clearance.
- Inspect the battery for swelling or deformation.
- Check whether the palm rest or bottom cover is lifting.
- Compare temperature while charging and after charging completes.
- Review battery-health information when available.
- Discontinue use if the battery shows physical damage or excessive heat.
Cooling diagnosis should include the battery when heat is concentrated away from the processor or when the chassis has begun separating.
A Cooling Pad Cannot Correct an Internal Blockage
External cooling pads can improve air circulation beneath some laptops, especially when the bottom intake openings align with the pad’s fans. However, they cannot remove dust packed inside the heatsink or restore failed thermal contact.
A cooling pad may reduce temperature slightly while masking the underlying problem. If the laptop still throttles, shuts down, or becomes extremely hot during ordinary workloads, the internal cooling path should be inspected.
External airflow can assist a healthy cooling system, but it cannot replace an obstructed or damaged internal one.
Temperature Testing Should Reproduce the Original Complaint
A laptop may appear normal during a brief idle test and overheat only during gaming, video calls, charging, software updates, or extended processor use. Effective diagnosis requires reproducing the same conditions under which the problem occurs.
- Record idle temperature after startup activity settles.
- Monitor processor and graphics temperatures during the reported workload.
- Observe fan speed and exhaust airflow.
- Check whether clock speeds fall as temperature rises.
- Allow the laptop to cool and confirm that readings decrease normally.
Testing under realistic conditions helps distinguish normal warmth from inadequate airflow, poor thermal transfer, excessive power use, and genuine cooling-system failure.
Firmware Updates Can Change Fan Response and Power Limits
Laptop manufacturers sometimes adjust fan behavior, processor power limits, charging logic, and temperature thresholds through BIOS or firmware updates. After an update, the computer may run the fan more aggressively, allow higher performance for longer periods, or respond differently to short temperature spikes.
A change in thermal behavior immediately after firmware work does not automatically mean the fan has failed. The update may have replaced the previous control profile or reset stored configuration values.
- Fan speed may increase earlier than before.
- The processor may remain at higher clock speeds for longer periods.
- Quiet or balanced profiles may return to default settings.
- Thermal warning thresholds may change.
- Manufacturer control software may need to be reinstalled or updated.
When overheating begins after a firmware change, the current BIOS version, manufacturer utilities, and active performance profile should be reviewed together.
Temperature Sensors Can Cause the Fan to React Incorrectly
The cooling system depends on temperature sensors located inside the processor, graphics chip, motherboard, battery area, and other parts of the laptop. These readings help the embedded controller determine when the fan should accelerate.
If a sensor reading is inaccurate, missing, or interpreted incorrectly, the fan may respond too slowly or remain at an unsuitable speed. In some cases, the opposite occurs and the fan runs at maximum speed continuously as a protective response to missing thermal information.
| Sensor Behavior | Possible Cooling Result |
|---|---|
| Reading lower than actual temperature | Fan may accelerate too late |
| Reading higher than actual temperature | Fan may remain unnecessarily loud |
| Missing sensor data | Firmware may use a protective full-speed mode |
| Unstable sensor value | Fan speed may repeatedly rise and fall |
| Incorrect software label | A normal reading may appear to belong to the wrong component |
Sensor problems should be confirmed through more than one monitoring source before the cooling assembly is blamed.
Monitoring Programs May Report Different Temperatures
Two hardware-monitoring utilities can display different temperatures because they may read separate sensors or calculate values differently. One program may show individual processor cores, another may show the processor package, and a manufacturer utility may present only a simplified overall status.
- Compare readings from a reputable monitoring utility.
- Review the hardware monitor available in the BIOS or UEFI.
- Check the manufacturer’s own diagnostic software.
- Look for impossible or fixed values that never change.
- Focus on temperature trends rather than one isolated number.
A consistent rise under workload followed by a normal decline during cooling is more informative than a single temperature reading without context.
A Damaged Bottom Cover Can Disrupt the Designed Air Path
The laptop’s bottom cover is part of the cooling system. Molded channels, vent openings, foam seals, and internal clearances help guide air toward the fan and through the heatsink.
A cracked, bent, or incorrectly installed cover can reduce intake clearance or allow air to bypass the intended path. Missing screws may also prevent the chassis from maintaining the shape needed for proper ventilation.
- Bent plastic can partially cover an intake opening.
- Missing rubber feet can reduce space beneath the laptop.
- Loose covers can interfere with fan movement.
- Incorrect screws can press against internal components.
- Damaged clips can leave airflow gaps around the fan housing.
Cooling tests performed with the bottom cover removed may not represent normal operation because the airflow design changes when the chassis is open.
Missing Rubber Feet Can Restrict Air Beneath the Laptop
Rubber feet do more than prevent the laptop from sliding. They create a small space between the bottom cover and the surface below it, allowing air to reach intake vents.
If several feet are missing or compressed, the bottom of the laptop may sit directly against a desk. Intake openings can then become partially blocked even on a hard, flat surface.
| Chassis Condition | Possible Effect |
|---|---|
| All feet present | Maintains the intended intake clearance |
| One foot missing | May tilt the chassis and reduce stability |
| Several feet missing | Can place intake vents too close to the surface |
| Swollen battery | May distort the cover and change ventilation spacing |
| Bent bottom panel | Can obstruct vents or contact the fan |
Restoring the original chassis clearance can improve airflow without changing the fan itself.
Thin Laptops May Operate Near Their Thermal Limits by Design
Compact laptops have less space for large heatsinks, wide vents, and high-capacity fans. Manufacturers often balance temperature, noise, weight, and performance within a very limited chassis.
A thin laptop may therefore reach higher temperatures than a larger model during the same workload. This does not automatically indicate a defect, especially if the computer maintains stable performance, avoids thermal shutdowns, and returns to lower temperatures after the workload ends.
High temperature and failed cooling are not always the same condition.
The processor’s thermal limits, the manufacturer’s design, and the actual performance behavior should all be considered before deciding that the laptop is overheating abnormally.
Normal Warmth Should Be Distinguished From Dangerous Heat
It is normal for certain areas of a laptop to become warm during charging, gaming, video editing, or other demanding use. The area above the processor, near the exhaust vent, or around the keyboard may feel noticeably warmer than the rest of the chassis.
More concerning symptoms include repeated thermal shutdowns, severe performance loss, burning odors, battery swelling, fan grinding, or temperatures that rise rapidly under very light workloads.
| Observed Condition | General Significance |
|---|---|
| Warm exhaust air during heavy use | Usually confirms that heat is leaving the system |
| Brief fan acceleration | Can be a normal response to background activity |
| Repeated shutdowns under load | May indicate severe cooling limitations |
| Very hot chassis with weak exhaust airflow | Can indicate restricted internal airflow |
| Burning odor or battery deformation | Requires immediate attention |
Thermal Shutdowns Should Not Be Treated as Normal Protection
A thermal shutdown is designed to protect the processor when temperature exceeds a safe threshold. Although the protection may prevent immediate damage, repeated shutdowns indicate that the cooling problem remains unresolved.
- Stop demanding workloads until the cause is identified.
- Allow the laptop to cool completely.
- Inspect vents and confirm that exhaust airflow is present.
- Check fan operation and temperature behavior under a controlled load.
- Discontinue use if shutdowns continue or the battery becomes unusually hot.
Continuing to restart the computer after every thermal shutdown places ongoing stress on the motherboard, battery, storage device, and power system.
Cleaning Requires Access to the Entire Cooling Path
Effective cleaning involves more than blowing air through an external vent. Dust may be packed tightly between the fan outlet and the heatsink fins, where it cannot be seen from outside the laptop.
Forcing compressed air into the vent without controlling the fan can overspin the blades, damage the bearing, or push debris deeper into the chassis. In some systems, the cooling assembly must be exposed so the obstruction can be removed safely.
- Disconnect external power before internal service.
- Disconnect the battery when the design permits.
- Hold the fan stationary during careful air cleaning.
- Remove compacted debris from the fin stack directly.
- Inspect cables and seals before reassembly.
Improper cleaning can leave the original blockage in place while creating additional fan or connector problems.
Post-Repair Testing Should Include More Than an Idle Temperature
A laptop may show acceptable temperatures immediately after startup but still overheat after several minutes of sustained work. A complete cooling repair should be tested under controlled conditions that resemble the original complaint.
| Test Item | What It Helps Confirm |
|---|---|
| Idle temperature | Shows basic cooling behavior after startup activity settles |
| Sustained processor load | Tests CPU heat transfer and fan response |
| Combined CPU and graphics load | Evaluates shared cooling assemblies |
| Fan speed and exhaust airflow | Confirms that air movement increases as heat rises |
| Clock speed under load | Reveals whether thermal throttling continues |
The computer should also be observed after the test to confirm that temperatures and fan speed return toward normal levels.
Professional Diagnosis Separates Fan Operation From Cooling Performance
A laptop fan that spins is only one sign within a much larger thermal system. Proper diagnosis examines the speed of the fan, the amount of exhaust airflow, the condition of the heatsink, thermal contact, heat-pipe performance, chassis ventilation, software workload, power settings, and temperature trends.
Replacing the fan without confirming the rest of the cooling path can leave the original problem unresolved. The fan may be functional while dust, damaged seals, poor heatsink contact, incorrect thermal pads, or an inefficient heat pipe continues causing excessive temperature.
When the complete cooling system is inspected and tested under realistic operating conditions, it becomes possible to determine whether the laptop is experiencing normal warmth, restricted airflow, reduced thermal transfer, excessive heat production, or a genuine cooling-component failure.